
FAQs | Repair Videos | Academy | Newsletter | Contact
Blogs
Featured Entries
-

The Master Samurai Tech Alumni Program
By Samurai Appliance Repair Man
Training at the Master Samurai Tech Academy is already a killer deal: comprehensive, state-of-the-art training that’s online and on-demand at tuition low enough that anyone can afford it. Well now we’re kicking it up to 11 with the Master Samurai Tech Alumni program. If you have been certified* in the Core course at the Master Samurai Tech Academy (formerly called the "Fundamentals" course) or earned Master Certification at the Mr. Appliance Academy (Bundle 1 only), you can get full te- 5 comments
- 17,028 views
-
[video] Troubleshooting a no convection bake problem on a GE Advantium Speedcooker
By Samurai Appliance Repair Man
We troubleshot a GE Advantium Speedcooker from the control board for a no convection bake problem and determined that either the convective heating element or the TCO had failed open. Testing each component individually required uninstalling the oven with special equipment. So on our second visit, we returned with both parts-- the convection heating element and the TCO. The specific failure turned out to be the non-resettable TCO that had failed open. Watch how I used the schematic to sele- 1 comment
- 12,909 views
-
Appliantology is Your Key to Appliance Repair Service Call Success!
By Samurai Appliance Repair Man
The Old Skool method of doing service calls was to go out on the call and pray to the pot bellied Buddha that the tech sheet was still hidden somewhere on the appliance. The plan being that, if the tech sheet was still there, you could stare at the lines and squiggles long enough to convince the customer you had reached a definitive and scientific conclusion about the problem. My friends, I'm here to tell you that the Internet has made this Monkey Boy way of doing bidness obso-frikkin-lete- 1 comment
- 3,880 views
-

How to Troubleshoot a GE Cooktop like a Real Tech vs. like a PCM
By Son of Samurai
What we call Parts-Changing Monkeys (PCMs) around here at Appliantology are techs who rely on pattern recognition, tech myths, and blind luck to make their repairs. Case in point with this example of a GE ZGU385 gas cooktop, where said PCM figured he would get lucky by replacing a couple of components that seemed related to the problem, apparently without any troubleshooting beforehand. Spoiler: he didn't get lucky. Real technicians don't rely on luck to get things fixed. We rely on kn- 15 comments
- 5,057 views
-
Samurai's Big Three Troubleshooting Secrets
By Samurai Appliance Repair Man
It's tough for appliance techs today. Our biggest competition is from cheap replacement machines. The proliferation of pricey electronic boards in appliances (and their uncertain procurement these days) means that if you can't quickly do a slam-dunk diagnosis, you are at risk of losing customers and your profitability. Meanwhile, electrical troubleshooting is largely a lost science. What exactly have we lost? The Old Skool troubleshooting techniques that us old timers learned way back. And- 10 comments
- 6,903 views
Our community blogs
-

- 220
entries - 728
comments - 149889
views
Recent Entries
How does a dryer dry without a vent? Why is there a sealed system in this dryer, just like what you would find in a refrigerator? How well does this model dry clothes compared to a conventional dryer?
All of those are questions we answer as we explore Whirlpool's hybrid heat pump dryer. In this thorough rundown of the machine's key systems and components, we cover topics such as:
- The function of the sealed system in this heat pump dryer
- How this dryer condenses moisture rather than venting it out
- Comparing the the heat produced by this dryer vs. conventional dryers
- Common customer concerns that you need to know how to address
- Key installation specifications that can severely impact the efficiency of this dryer
- How the compressor runs on 240 VAC and why
...and more!
You can watch this full workshop recording for free and learn all about these topics right now! Just click play below and start your journey.
Interested in more of our technical training workshops? Click here to see the full index of 100+ hours of training videos. These are viewable only by premium tech members of Appliantology -- click here to become one today!
If you're looking for appliance repair training, look no further than Master Samurai Tech. We have courses that teach you schematic reading, troubleshooting, motors, refrigerators, washers and dryers, ovens and ranges, and more.
- Read more...
- 0 comments
- 220
-
 Latest Entry
How to Decipher Schematics like a Pro!
In this journey to Total Appliance Enlightenment™ in a Live Dojo workshop, we worked on a real-world problem on a Kitchenaid refrigerator posted at Appliantology. We were interested in how the defrost timer motor gets Line and Neutral in both defrost and run modes. Turns out that doing so required that we also understand the rest of the circuit, including the dumbed "PC board". But how do we do that? That's exactly what we show you in this workshop recording!
In this short little half hour video, Son of Samurai shows you the process of deciphering a schematic so you can figure out how your load of interest is supposed to get its power supply. He shows you how he used the schematic, specifications, the parts manual, and pictures of the parts all together to figure out how the entire electrical control of this refrigerator. Along the way, you'll learn about the famous "loads in series" configuration and how a load can feed Neutral (or Line) to another load all by design.
Keep in mind, we did all this using only technical literature available to us on the web. This means you can do one helluva lotta prediagnosis before you even step foot in the house.
As you watch, focus on the process for figuring it out, not the answer. Understanding the process will empower you to figure out many of the electrical problems you face on service calls. Premium tech members at Appliantology and MST students may watch the video here.

Not a premium tech member at Appliantology? Check out your tech membership options here.
-

- 4
entries - 34
comments - 1428
views
Recent Entries
 Latest Entry
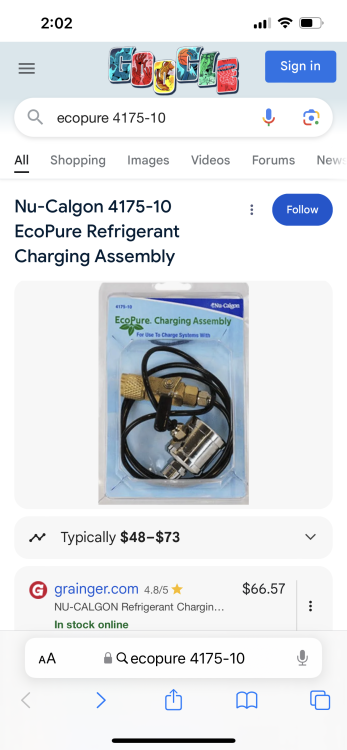
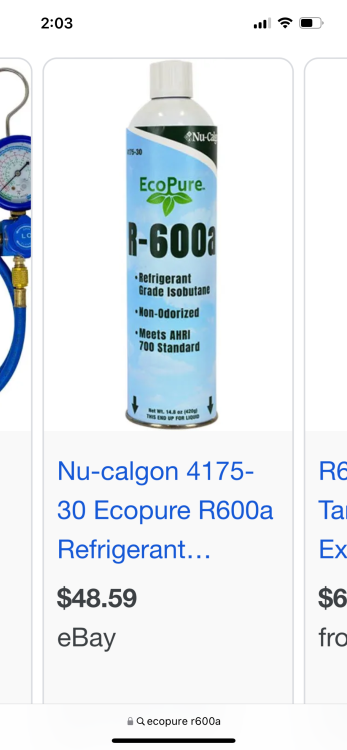
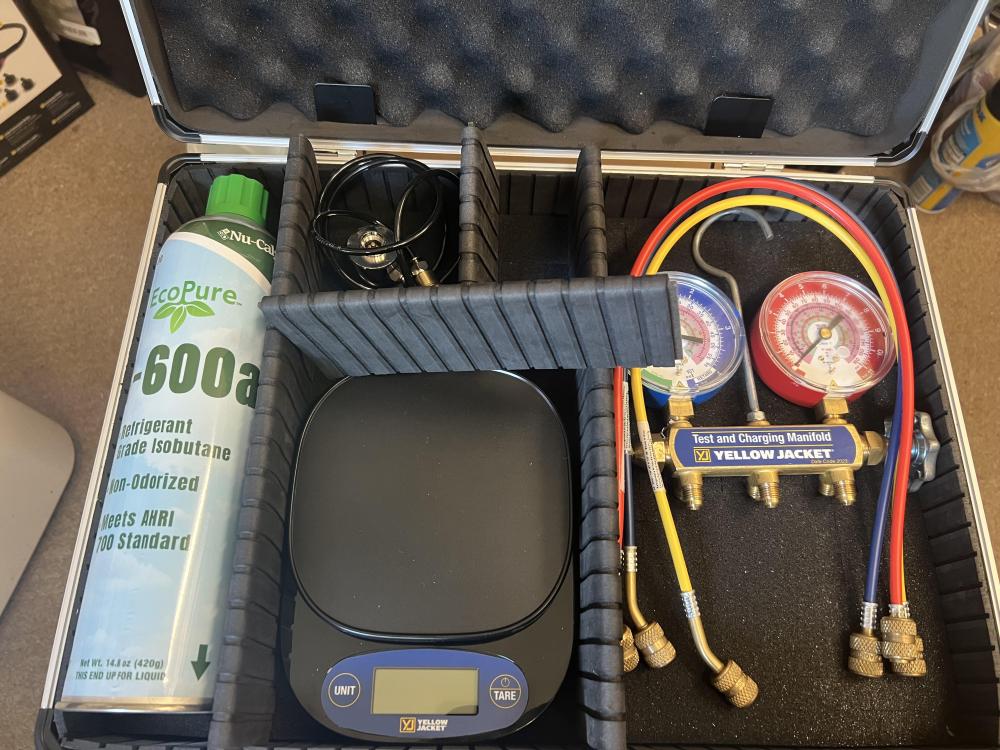
R600a starter kit
About a year ago I was ready to start learning R600a systems. Watched all the vids and decided I was ready to buy. I bought the Yellow Jacket 61001 kit. What I found was it has little of what I need. So, after getting some experience with R600a systems, it was time to groom one of my techs that’s wanting in the game. So I put together a kit for him, and thought I’d share.
For sealed system repairs, I’m still using my normal gear, nothings changed. But I wanted this tech to have the equipment to check the system, and be able to dump, pull vacuum, add dye, weigh in charge. What I’m seeing in the field is refrigerant leaks that are undetectable with my sniffer. So to find the leak we’ll have to add dye and come back and see if we can find it. It’s been pretty quick and easy for me to do this. There’s such a low charge with a leak that it seems there’s little in the system. The longest part is pulling a vacuum and getting rid of some moisture.
Yellow Jacket 41868 manifold and hoses

Yellow Jacket 61003 scale

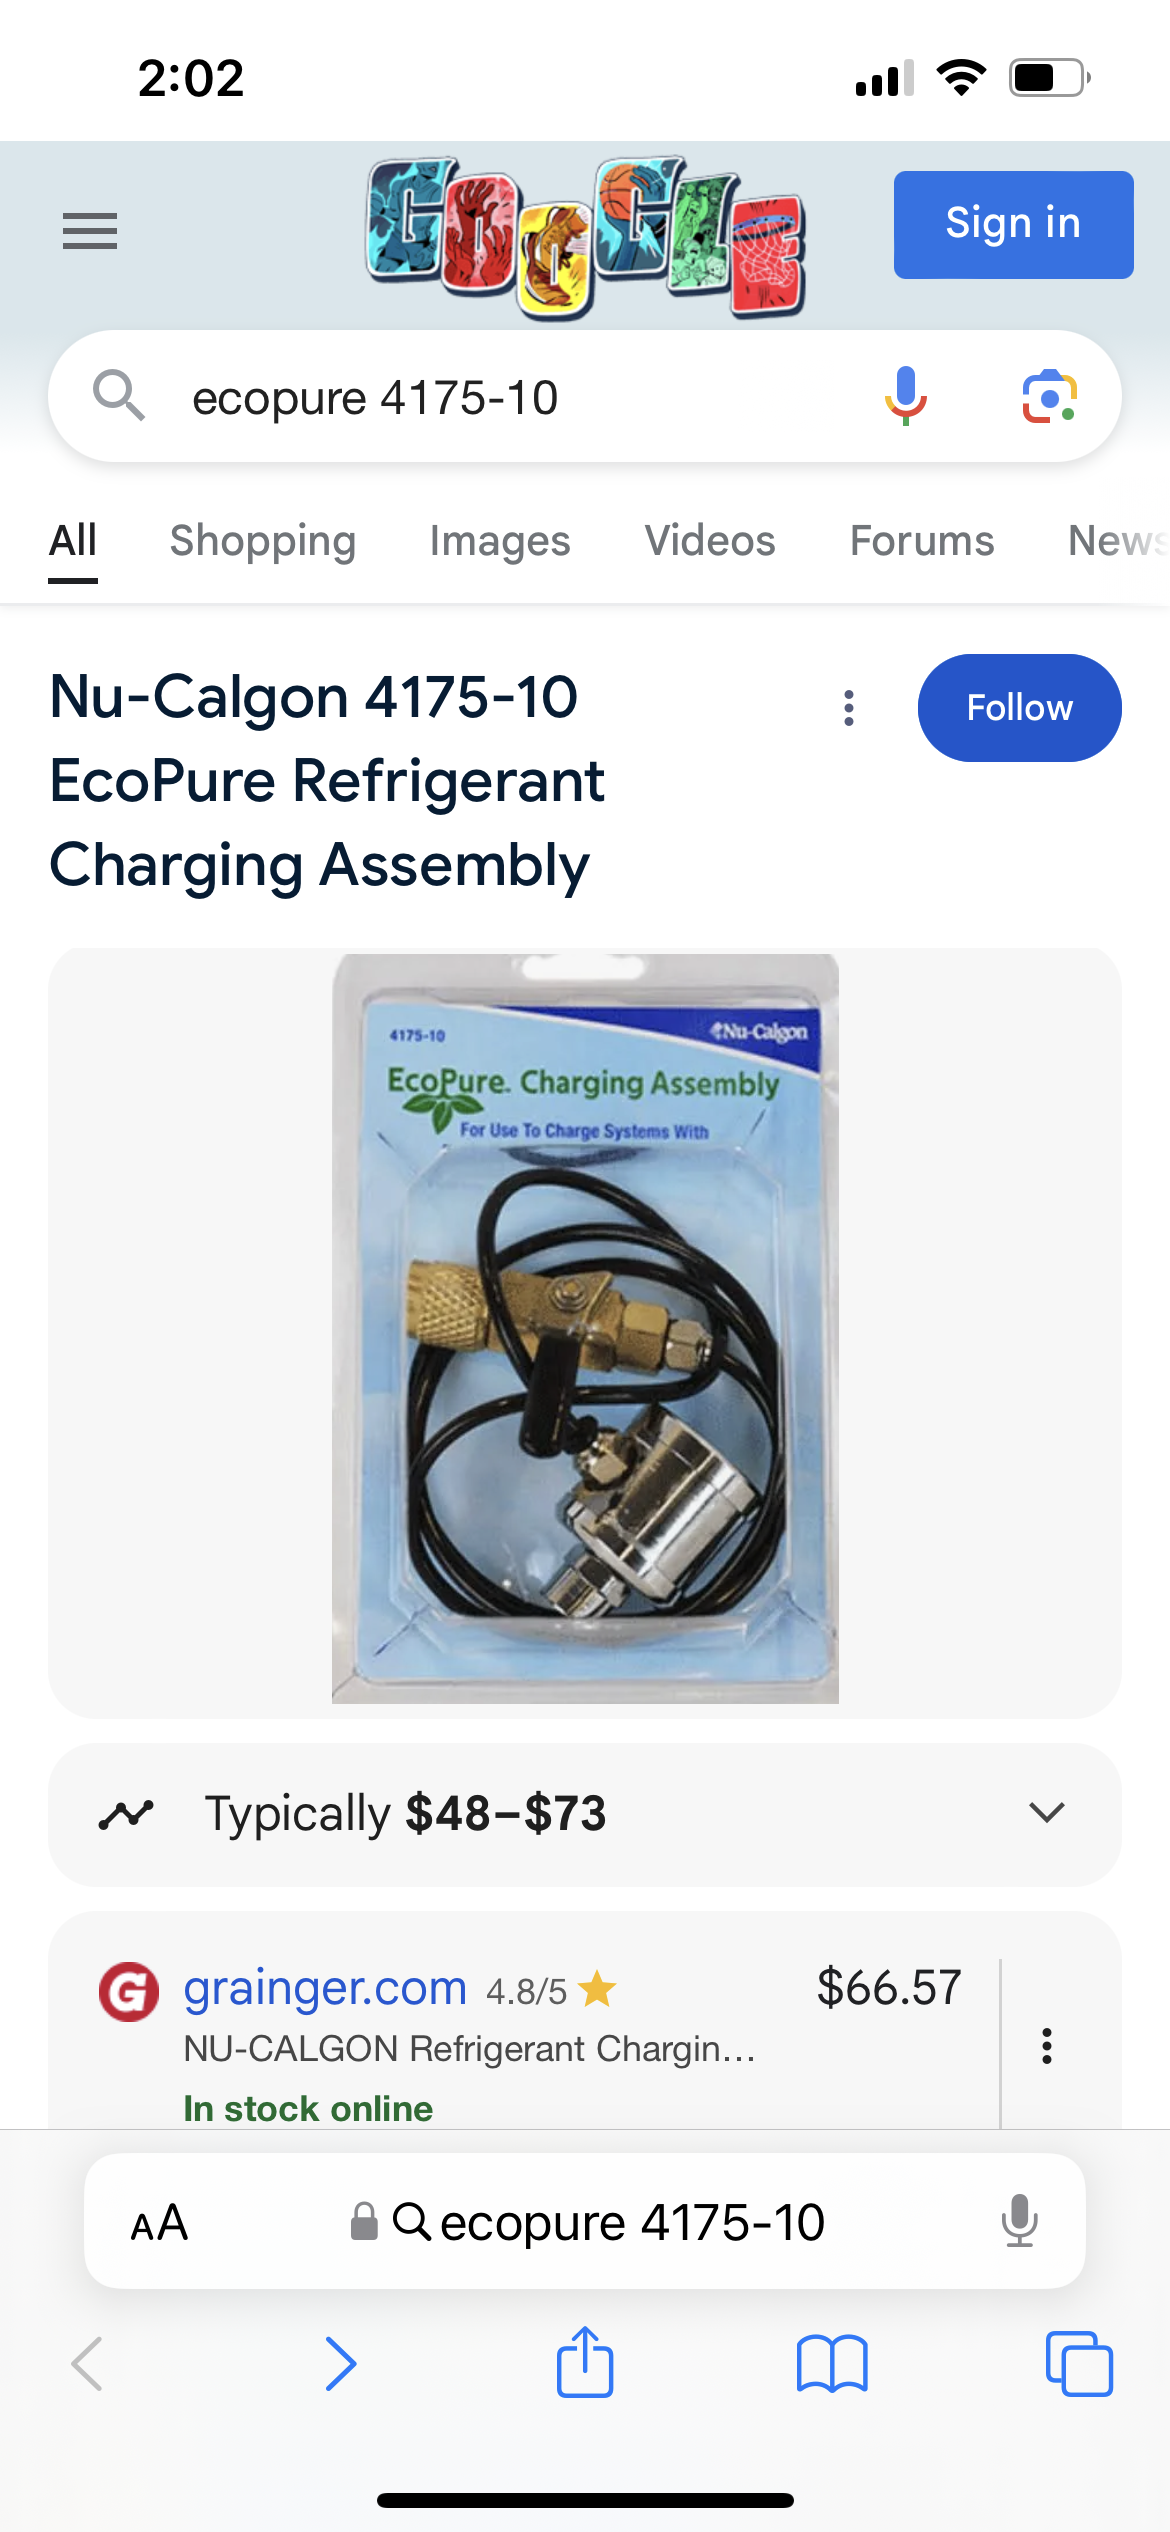
Nu-Calgon 4175-10 charging assembly
Nu-Calgon 4175-30 refrigerant
Pittsburg 2.5cfm vacuum pump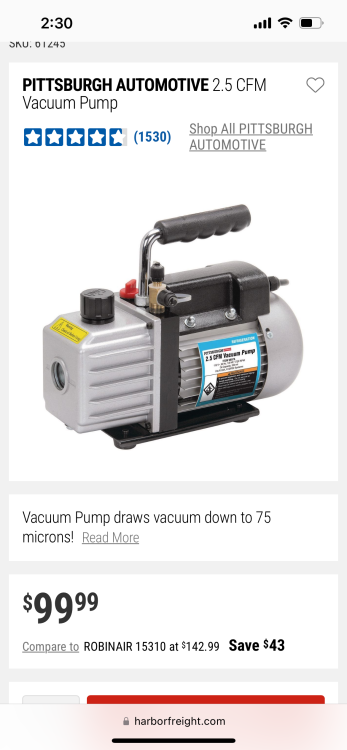
So I put together a kit for him.
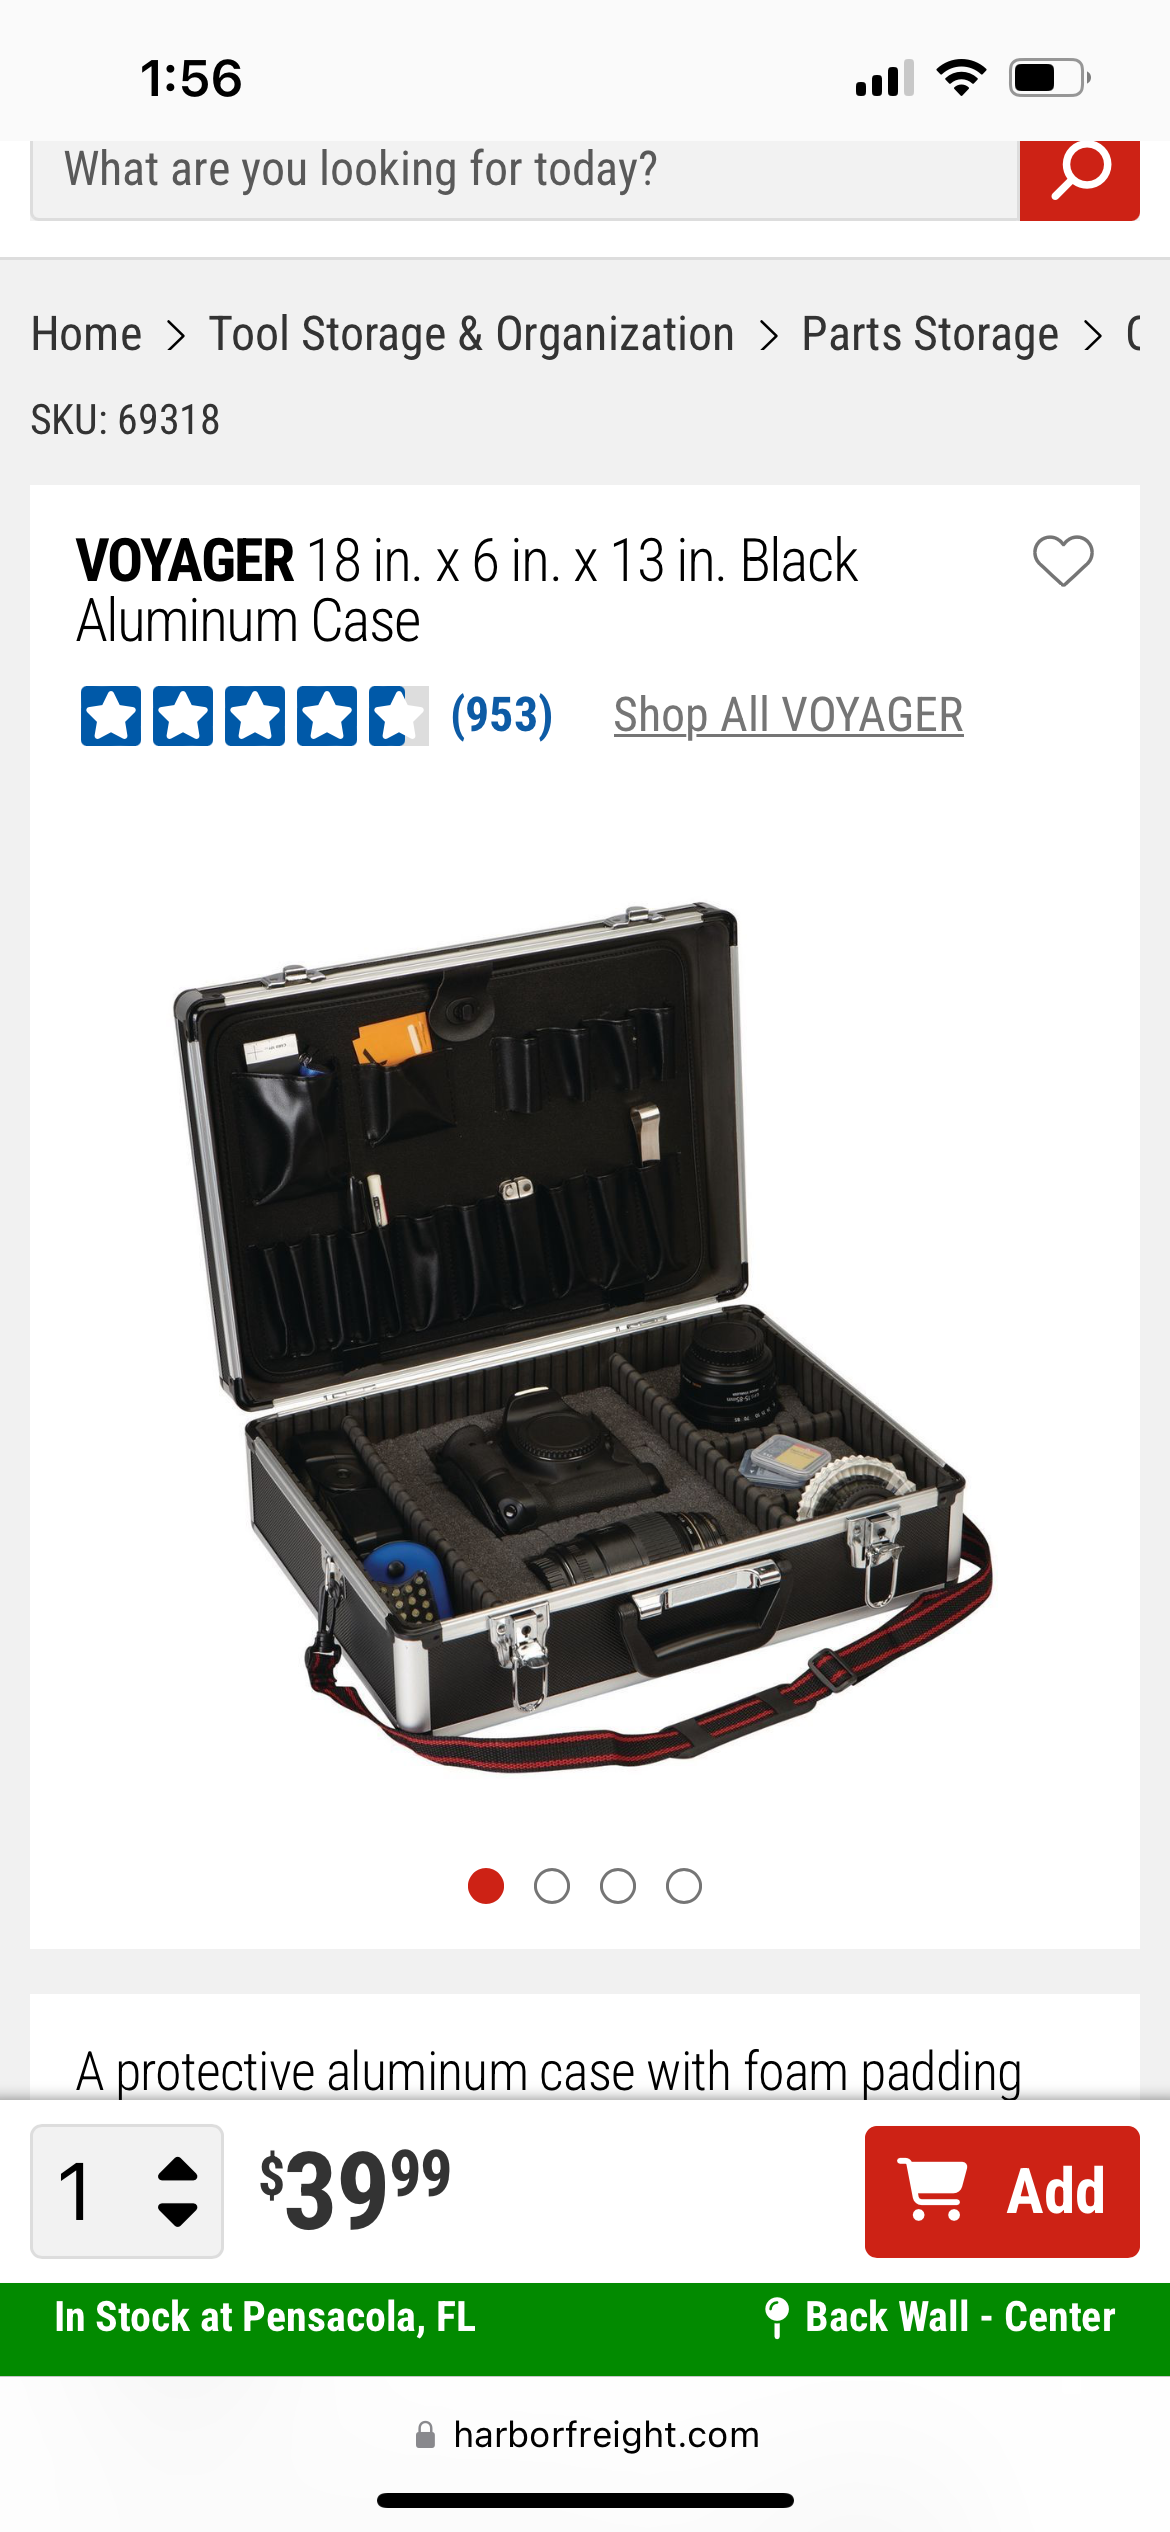
Found the perfect case at Harbour Freight- called Voyager.

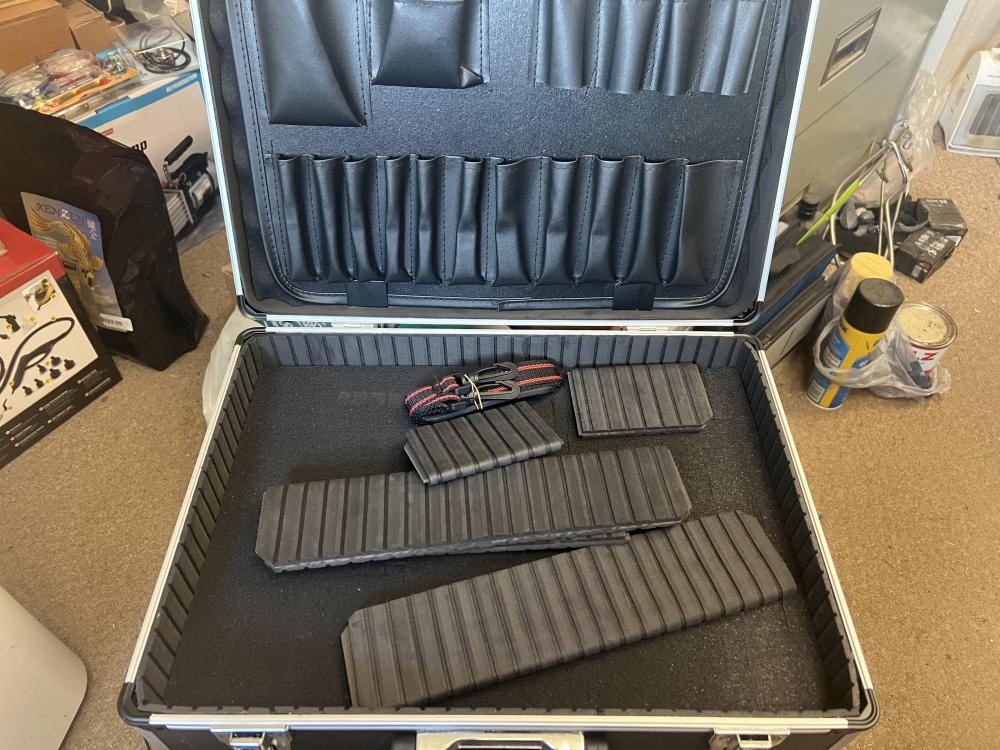
Mock setup
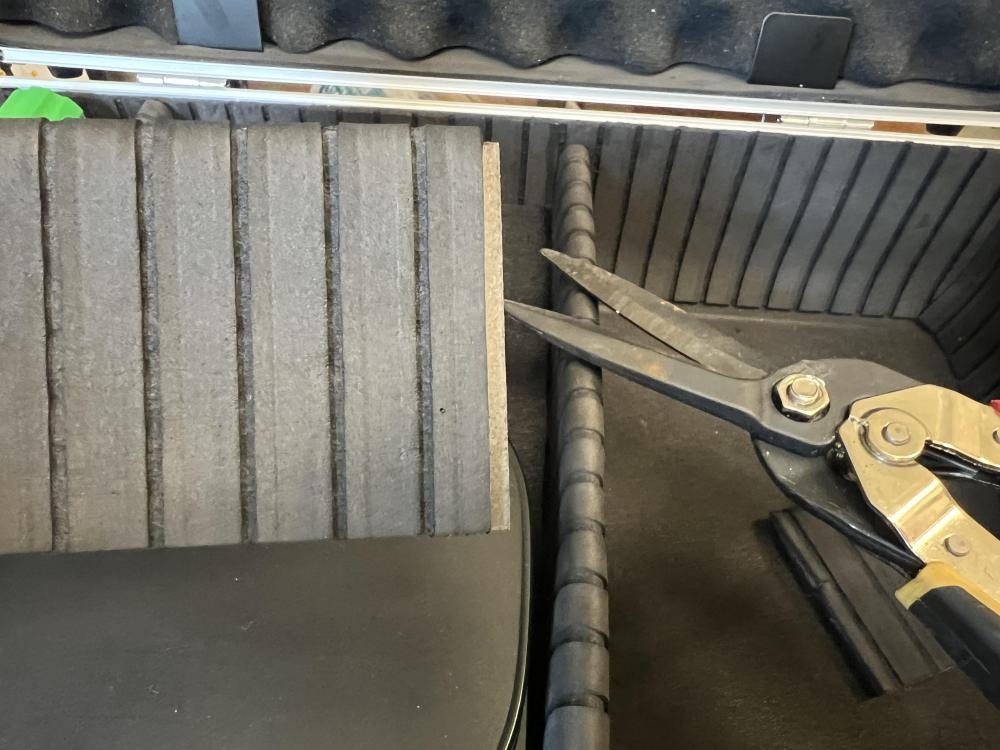
Marked off what I needed to cut.
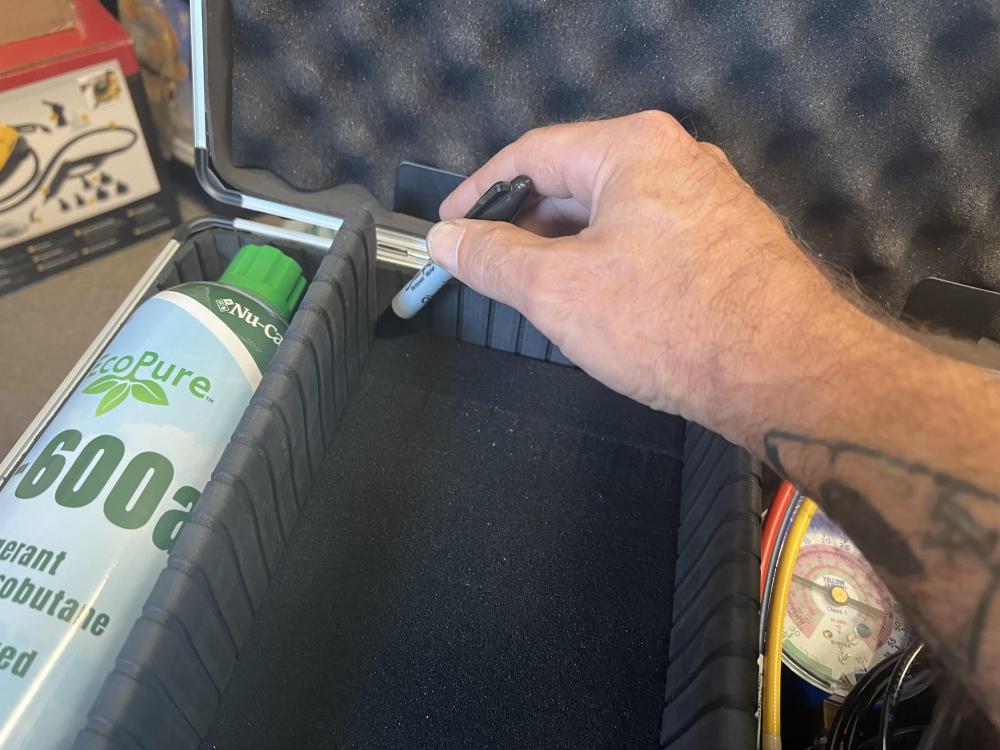
Trimmed up the partitions needed.
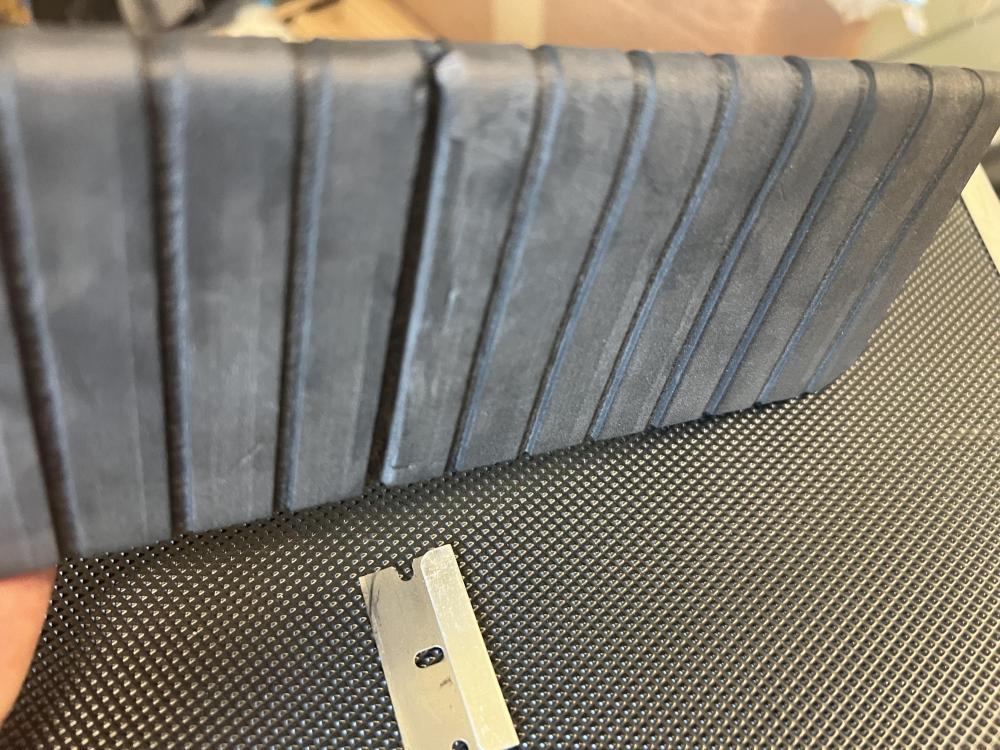
Had the perfect piece of styrofoam to act as a spacer, this keeps the can lower but raises the scale, manifold and adapter so they fit snugly and don’t bounce around.

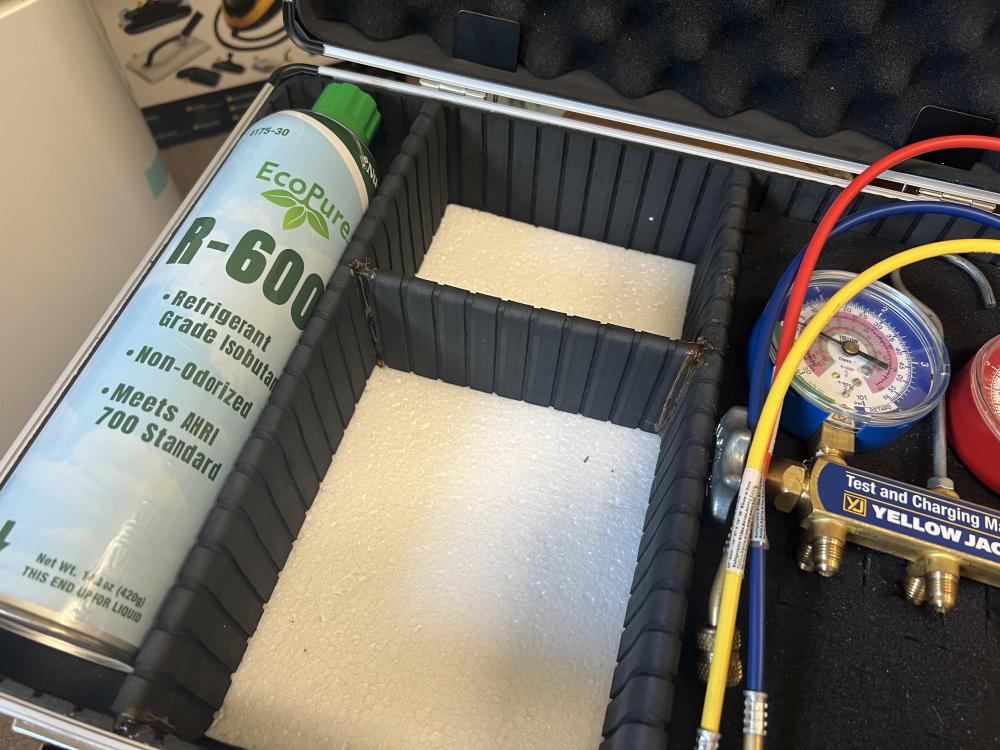
Glued up the corners with some dryer felt glue. Added the foam…. Boom done!
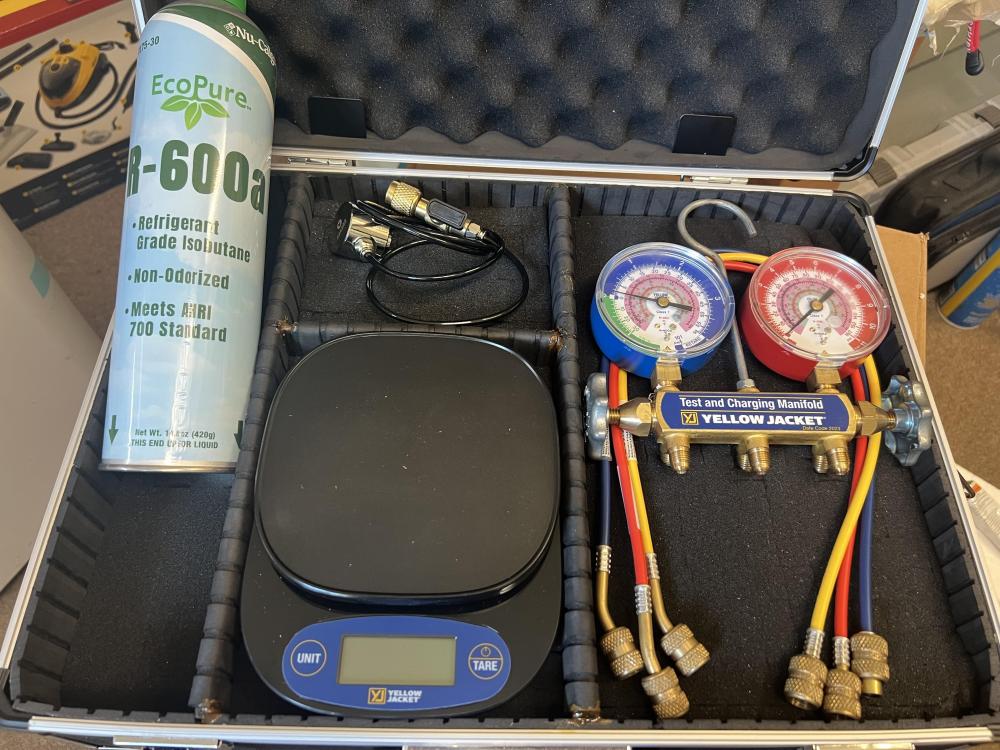
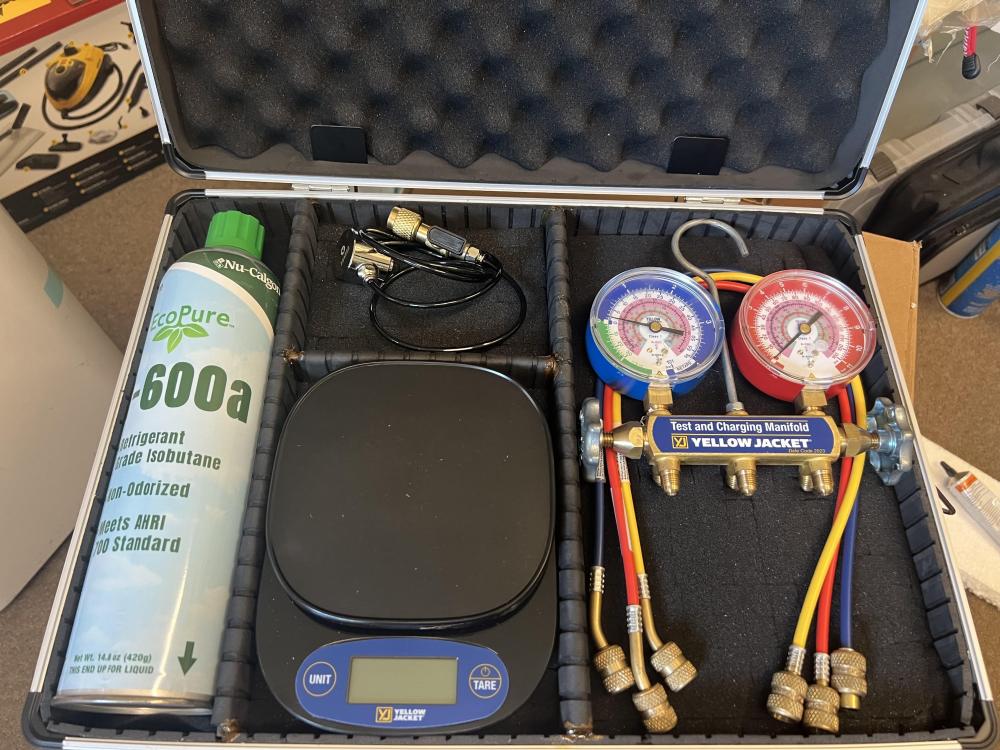
Saved hundreds and saved space.
- 4
-
Inevitably you will at some point in your career damage a customer's stuff. Most common is usually the appliance you are working on, or the floor. The big stuff is flooding a customer's house, fire, smoke, etc.
Let's talk about the small stuff first.
Scratched/ damaged appliance: Just understand that your maximum liability on this is the value of the appliance. Not the cost to replace. The value of a 10 year old used appliance. If you did the damage the first thing you should do is own it. Second, and most important: Dont ever talk about insurance or compensation etc. Once you start planting ideas in the customer's head, there is no turning back. For example: you broke a crisper bucket during removal. All you need to say is "your crisper bucket broke during disassembly, do you want me to order you a new one? The cost is X.XX. Its not so much you want them to pay for the bucket, its more so that you are conveying that you did not just F* up. Normal course of things. If you arent that brave, just tell the customer what you did and that you will bring back another one in a few days.
You dented the door: Say to the customer: "How do you want to resolve this?" You really need to smear on the humility. Call yourself and idiot, etc. The goal is to build empathy, and avoid the adversarial confrontation. You will be surprised how often they say don't worry about it. Sometimes they ask for a discount, some will ask for a new door. If they ask for a door, look it up right there, on the spot. Figure out the cost of the door, write the lady a check on the spot for the door + $150 for someone else to install it. Its not your problem that the door is NLA, I can almost guarantee you they will just pocket the money and buy a fifty cent magnet. The important part is to settle the matter right then and there. Write the check, or discount the bill, you need to specifically write that you are fully compensating them for the damage to the door. Make them sign.
The damaged flooring: This is one where most of you will throw your hands up and file a claim. I have been in the appliance business for 20+ years and I can shamefully tell you I have (my delivery guys really) damaged many floors, doors, windows, walls, cars, and more. If you damage a floor, do not get the customer involved. Its your mess, you clean it up. If you tell the customer to go get an estimate, you will end up buying Karen a new floor. Most flooring damage is in the way of a dent, and some more severe have a dent/ minor scratch. A good steam mop will pull 99% of dents out. If there is a scratch, buff it out with a bit of floor polyurethane and a rag. The trick to resolving this in my experience is to do the entire kitchen. Just steam/ clean, not POLY) Steam ALL of her dents out ,and get an excellent hardwood floor cleaner (like BONA) and clean her floors. Leave her the cleaner as a parting gift. When you see the customer's eyes get big, or crack a smile, not only did you dodge an expensive bullet, but you get to keep the customer.
YOU change the window, YOU (or YOUR contractor) fix the wall/paint/trim. Your people will look out for you, and generally will give you an excellent price for the correction. Your customer's contractor will get paid big time.
If you break a ceramic tile: If you break a tile its either you were Grossly negligent, or the floor was installed incorrectly. Buy the closest thing you can find, but DO NOT install that tile in front of the stove/ fridge. Its likely not an exact match and will look out of place. Harvest a tile from under the fridge or stove and install that tile, putting the new tile out of sight.
Water damage- wood flooring: If you catch it within a couple weeks you should be fine. Wood swells up when wet, and will always shrink when dry. Solve the leak, apologise profusely, and get to drying it. Hair dryers, towels, and a few trips will take care of it.
Water damage drywall: Hire a contractor, tell him to take care of it 100%, AND SEND YOU THE BILL.
WHY BOTHER, I HAVE INSURANCE FOR THIS? Your insurance will cover the first claim, and I promise at your renewal you rates will skyrocket IF they even take you back. If you file 2 claims in about 5 years, not only will your insurance co drop you, but good like finding anyone to cover you. If you do some BIG damage, like massive flooding or fire/ smoke, that is what insurance is for.
It really boils down to this: You can fix a scratched floor for a few hundred dollars. Once you get insurance, the customer, and random contractors involved, it instantly becomes a four figure repair. You will end up paying for all of it one way or another.
-
- 6
entries - 60
comments - 21223
views
Recent Entries
 Latest Entry
Pricing Service in a Small Service Company
From the latest USA newsletter:
Pricing Service in a Small Service Company
By David Oliva
While doing research for this series of articles the topic that came up most frequently was pricing. How do I know what to charge, what pricing structure should I use, what’s “fair”, what’s the value of our service, should I be cheaper than my competitor, etc? Appropriate and profitable pricing is one of the most important parts of running a successful small service company (SSC). It’s also one of the most difficult. Most SSC owners, me included, have no formal business training and so we struggle with issues like this. Many SSC owners undervalue their skills by quite a bit because of this lack of training and so are sometimes extremely underpriced. This creates a variety of problems such as not having enough extra income to cover the cost of necessary training and an inability to expand or improve the company due to lack of funds. It also creates a problem for the industry as a whole because it undermines professionalism and creates an atmosphere where customers are taught not to value our profession as they do other professions.
Let’s start at the beginning. The foundation for all pricing starts with your cost of doing business (CODB). Without knowing your CODB setting prices is a guessing game. United Servicers Association has a great, free, CODB calculator on their website. What it will allow you to do is input all of your expenses and calculate your CODB on an hourly basis. Knowing how much it actually costs you simply to be open for business each hour of the day is invaluable and, at least the first time you do it, eye opening. It was a big shock to me when I ran those numbers about 5 years ago. I had no idea we had to spend so much money just to be open. Once you have that number you can begin planning a pricing structure.
Link to USA free CODB: https://www.unitedservicers.com/codb-calculator
There are two basic structures for pricing, hourly or flat/job rate. An hourly rate is self explanatory but a job rate structure may be unfamiliar to some. A job rate structure will typically have between three and ten rates, which will vary from the simplest jobs to the most involved and complex. With a job rate system the time it takes to complete a repair is only one factor out of many used to determine the price. Job rates systems are generally the most profitable way to price repairs in our industry. The benefit to the independent SSC of a job rate system is the ability to capitalize on experience and skill. With an hourly rate the better and faster one gets the less money they will collect on each job, making it necessary to complete more jobs to make the same amount of money. With a job rate system the faster you are the more you make because the price of the repair is not tied to time. Job rate systems reward skill and efficiency.
What is fair? This is a contentious point in our industry. Many SSC owners feel that we should not charge professional rates for the work we do or that job rates are “unfair” to the customer because they tend to increase the overall repair price. I believe this stems from a lack of respect for the work we do, even from people within our industry. This attitude, as stated above, undermines the industry as a whole. There is no reason why we should not be well paid for the service we provide to our customers. Fairness is subjective and so it is a meaningless concept in regards to pricing. Pricing in an SSC, which typically does a low volume of repairs relative to larger companies which can take advantage of high volume, should be fundamentally based on two points. The first, and most important, is CODB. Without covering your CODB you will fail, this is simple math. If your CODB dictates rates that you feel are “unfair” then you either need to reduce your CODB or let go of the idea that prices can be fair or unfair. The second point is your market. After you’ve calculated your CODB you can then feel out your market for profit maximization. The old school method for feeling out maximum price still holds true, if you’re not getting at least a few complaints about your prices you can charge more.
Value is also subjective, and so ideal customers may be those that place a premium on quality service and are willing to pay for it. If your market is a large metropolitan area then chances are high end brand appliances are plentiful in your service area. Typically customers with these brands will value quality over price and be willing to pay higher rates for better service. In such a case why try to compete by having the lowest price? Why not offer the highest level of service available and charge appropriately for it? Competing on price is often a race to the bottom and in the current economic climate lowering your prices may not be a viable option. Compete on quality, not price.
The biggest obstacle to higher rates, and higher profits, is often psychological. It’s very common to hear SSC owners say “I can’t charge that! No one will pay it. My competitor only charges $10.” This is a myth based on nothing but fear. I was once browsing the racks of luxury retailer Neiman-Marcus and came across a shirt from the designer brand Givenchy. This was a simple sweatshirt with a screen printed Rottweiler on it. This shirt was priced at $900. You may not be interested in designer fashion, but LVMH Group, the parent company of Givenchy, made about $5.7 billion in profit in 2017. The point being that customers are willing to pay almost anything for what they perceive to be valuable. And this is where value comes from, a product or service is valued at whatever people are willing to pay for it. If you can set up your company to be perceived as more valuable than your competition then you can command higher rates.
This industry is full of people who love what they do, and are very good at it. They treat their customers with respect; they provide quality service and honor their warranty. The go out of their way to help people who need help. And so why shouldn’t they make enough money to drive a new service vehicle, have excellent health insurance and take a great earned vacation now and then? Why shouldn’t they value their skills the way other trades and professions value theirs? Why shouldn’t there be enough extra profit to provide for a great retirement, another topic of great interest to SSC owners? The answer to all of those questions is they should, and there should be. Pricing appropriately will ensure that and we need to focus more on this, and in greater depth, especially for the SSC owners, since we are the ones who need the most help with it. - 6
-
We all want to grow our companies, but finding and keeping qualified techs or just finding anyone that posseses even the slightest work ethic is a difficult, near impossible task. This song laments this sad state of affairs but also is a tribute to the recent passing of one of the greats.
Scroll down, start the video, scroll back up and sing along!
Whirlpool Drain (or if Prince was an Appliantologist looking for good help)
Maybe you never meant to cause me any sorrow
Maybe you never meant to cause me any pain
I only wanted to one time see you working
I only wanted to see you
working on a Whirlpool DrainWhirlpool Drain, Whirlpool Drain
Whirlpool Drain, Whirlpool Drain
Whirlpool Drain, Whirlpool Drain
I only wanted to see you
Steaming up a Whirlpool DrainI never wanted to be a hard-assed employer
But neither could I be some kind of friend
Now please go away, go work for another
For your employment with me has to endWhirlpool Drain, Whirlpool Drain
Whirlpool Drain, Whirlpool Drain
Whirlpool Drain, Whirlpool Drain
I only wanted to see you
Underneath a Whirlpool DrainDude, I know, I know
I know appliances are changing
It's time we all reach out
to learn something new, that means you tooYou say you want me to teach you
But you can't seem to concentrate your mind
So I think you better pack it
Since you can't even Ptrap a Whirlpool DrainWhirlpool Drain, Whirlpool Drain
Whirlpool Drain, Whirlpool Drain
Service Owners, if you know what I'm singing about up here
C'mon, raise your handWhirlpool Drain, Whirlpool Drain
I only want to have one
Only want to see one
Working on a Whirlpool DrainThis song debuting on AppLYRICology Best of Durham Music Vol 1
-
- 18
entries - 45
comments - 55817
views
Recent Entries
 Latest Entry
Back to normal life
Well ladies and gents. Sorry I have been MIA for a while. Life has been crazy with service calls and my new technician. Also had our first baby (technician in training)
 . It's been an amazing experience. I am loving every second of it. It has been tough through all the changes which is why i have been absent from here for a bit. But i'm BACK! I hope the Samurai and Durham have been holding the fort down and not letting you guys get away with too much! hahaha.
 - 18
-
 Latest Entry
How to test motor speeds (RPM)
I was talking with another tech this morning about checking RPM. this brought up the subject of strobes. As we were
discussing strobes it occurred to me someone had probably created an app with RPM already. Shazaaam!!!

Here's a app that will allow you to test RPM on fans. You can also test motor rpm, if, you place a mark on the shaft.
https://itunes.apple.com/us/app/strobe-light-tachometer-to/id708094321?mt=8
To check fan speed just dial it in till the fan appears to be not moving at all. That'll give you your RPM.
Same with a motor if you mark the shaft. When the mark appears to no longer be moving you've got the RPM.
I'm not really sure if this is the correct use of this Blog thingy, but, bet I'll find out sure enough!! Yeeehaw!!!
Huh... I hope I wasn't the last person on earth to figure this out!
-
- 25
entries - 45
comments - 248669
views
Recent Entries
 Latest Entry
Coconut Lime Chicken Soup
Here's a Thai-inspired chicken soup that is easy to make and bursting with flavor! It's healthy comfort food with an Asian twist.

Ingredients
- 2 tablespoons coconut oil, ghee, or butter
- 1 onion, chopped
- 1-2 pounds uncooked chicken breast, diced
- 1 inch piece of fresh ginger, peeled and chopped fine
- 4 cloves garlic, minced, divided
- 1 quart chicken broth (I use either homemade or a box of low sodium, no added MSG.)
- 1 can coconut milk (look for this in the Asian/Thai section of the grocery store. I prefer regular, not "lite".)
- 1 lime, juiced, divided
- ¼ tsp. red pepper flakes
- 4 scallions, chopped
- ½ bunch cilantro, chopped
- salt, to taste
- optional: Thai fish sauce, cooked rice
Directions
Heat a soup pot over medium high heat, then add the coconut oil. Saute the onions with a little salt for a few minutes, then add the chicken chunks with a little more salt. Cook, stirring frequently, until chicken is just cooked through. Add the ginger and half of the garlic towards the end of this.
Stir in the broth and bring to a boil, then stir in the coconut milk, half of the lime juice, and the red pepper flakes. Reduce the heat to low and simmer covered for at least 15 minutes (longer is fine, too).
Turn off the heat, and add salt to taste (depends on the amount in your chicken broth). Stir in the rest of the garlic, the scallions, and most of the cilantro (leave a little aside for topping individual bowls). Add the rest of the lime juice if desired. Cover and let sit off-heat for 5 to 10 minutes, then serve.
Great served over rice. Add a few drops of fish sauce to your serving to knock the flavor out of the park!
- 25
-
- 3
entries - 5
comments - 17375
views
Recent Entries
[Yes, I did reset the breaker and checked the voltages. Here's the wiring diagram:
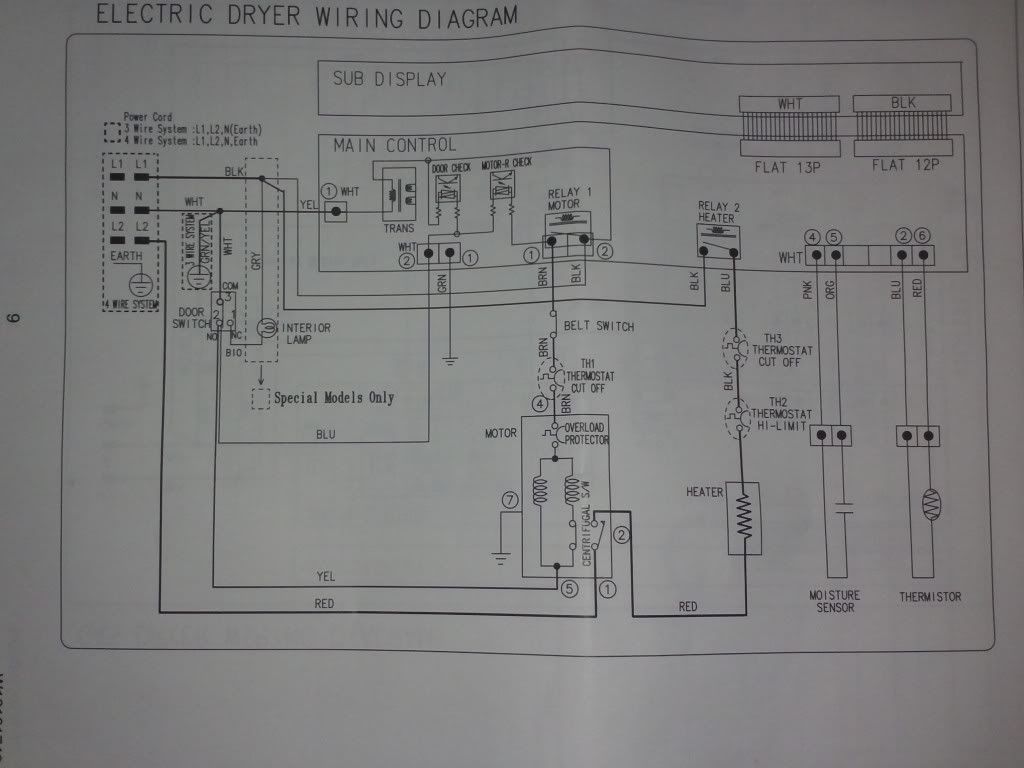
Source: Amana NED7200TW Dryer no heat, problem with cycling thermostat?
- 3


Announcements
-
Upcoming Events
-
Blog Statistics
-
Total Blogs10
-
Total Entries1,172
-
-
Blog Entries
-
By Son of Samurai in Appliance Repair Tech Tips0 comments
-
By Samurai Appliance Repair Man in Samurai Appliance Repair Man's Blog1 comment
-
By Son of Samurai in Appliance Repair Tech Tips0 comments
-
By Son of Samurai in Appliance Repair Tech Tips0 comments
-
By Son of Samurai in Appliance Repair Tech Tips0 comments
-