
FAQs | Repair Videos | Academy | Newsletter | Contact
-
Upcoming Events
-
07 June 2025 02:00 PM Until 03:00 PM
0All are invited to join in the conversation for all things Appliantological: bidness, customers, tools, troubleshooting, flavorite brewski, whatever. Webcams and microphones are open and live!
Also, follow this Calendar Event so you'll get notified of new posts here. Look for the "Follow" button either at the top of the topic on desktop or below the topic on mobile.
Who: This workshop is available to everybody, including you! You don't have to be a member of Appliantology to join the fun.
When: Saturday, June 7 @10:00 AM Eastern Time.
Where: Online via Zoom
How:
Click here to register. If you're interested, register now. Arrive a couple minutes early to make sure your connection is working. Set a reminder for yourself for this workshop so you don’t miss it.
-
All Activity
- Today
-

Video - FIRST USE - Making Better Hose Clamp Pliers, Pt. 4 - First Blood
Rhubarb Tau posted a blog entry in Rhubarb Tau's Sloggy Vlog Blog Bog
Well, it took me a minute to actually throw the prototype pliers in my toolbag and then remember to actually try them out, but I finally did... Video linked below. tl;dw... Not bad! For larger size clamps, seem to be exactly as suitable as std KP-2s, and much better mechanical action -
 MikeyD joined the community
 -
 tomkapushinski joined the community
 -
 tedantal joined the community
 -
 Jayson Tatu joined the community
 -

Flood damaged GE refrigerator freezer not cooling
Budget Appliance Repair replied to TadTV's topic in DIY Appliance Repair Help
Check to make sure the condenser fan motor in the back by the compressor is working - It very well could have been under water also and be frozen up. Also check to make sure the evaporator fan is working - probably is since you say the refrigerator section is getting a little cooling.- 1 reply
-
- 1
-
.png)
-
 bhorne joined the community
 -

Can You Identify This Sensing Line and These Useful EEPs?
Son of Samurai posted a blog entry in Appliance Repair Tech Tips
Take a look at the defrost circuit on this Whirlpool refrigerator: Looks pretty standard -- there's just a defrost heater and a defrost terminator in the circuit, and voltage is supplied to the circuit by the control board. But what is the purpose of the wire marked in green that tags off to J1-3? If you look closely, you'll see that that pin on the control is labeled D-SENSE -- so that's a sensing line. This means that the purpose of that wire is to give the control board information about a circuit. In this particular case, it lets the control board sense the state of the defrost terminator. How does that actually work? Well, if the defrost terminator is closed, Line voltage will be present at J1-3, like so: But when the terminator is open, Neutral is instead present at J1-3, like so: This is how the control board's adaptive defrost algorithm gets the info it needs -- based on how long Line is present or absent at J1-3, the control is programmed to adjust the length of defrost cycles. It's useful for our troubleshooting purposes to know how the control board thinks, but the presence of this sensing line is also useful for our own troubleshooting purposes. Because the sensing line is there, we are able to perform an electrical measurement on the defrost terminator without disassembling to reach the defrost circuit. Having put the unit into forced defrost, we can perform a measurement with our loading voltmeter like so: If the defrost terminator is closed, as shown, then we would read 0 VAC on our meter, since we're reading from Line to Line. If the terminator were open, like so... ...then we would read 120 VAC, since we're now reading from Line to Neutral. There's even more that this sensing line lets us do right from the control board. Because the line splits the defrost circuit in half, we can use it to check if that heater has gone open with another voltage measurement. This time, we won't place the unit in forced defrost. Instead, we're going to use the control board's line supply as a reference to check for the presence of a good Neutral at J1-3, like so: Because we're using a loading meter, we will only read voltage between these two points if the heater has continuity. If you get 0 VAC, then you know you have an open heater. All of these clever tests are not just so we can feel smart -- it actually saves time (and therefore money) on the job. The less disassembly you have to do, the more jobs you can get done and the less liability you have to take on. Work smarter, not harder! Want to get in on the action? Join the Brotherhood of Techs at Appliantology. Appliantology.org is a cultivated, private community of techs. Get solid tech advice from working, professional techs and business owners. Avoid the endless noise and guesswork thrown at you from groups on social media. Download the service manuals, tech sheets, and service bulletins you need to git 'er done. Join the Brethren in the Craft right now with our membership options at Appliantology and see how it can help you in your business starting today. -
Service manual for Thermador T36BT820ns/03
Son of Samurai replied to CLT Appliance's topic in Appliance Service Manual Requests Forum
Uses these docs: -
 Alex Jergovic joined the community
 - Yesterday
-
 Christopher Petrich joined the community
 -

Service manual for Thermador T36BT820ns/03
CLT Appliance posted a topic in Appliance Service Manual Requests Forum
Manufacturer: Thermador Type of Appliance: Refrigerator Model Number: T36BT820ns/03 Have you validated the model number at an online parts site like Repair Clinic? (yes or no): Yes Have you watched the video on how to search for manuals and have you searched the Downloads section prior to posting this request? (yes or no): Yes I’m looking for service manuals on the website, but I’m having trouble finding the ice maker test ‘IWS’ in the service mode. I’m assuming it might be different for this model. Thank you. -
Appliantology Live Dojo, Saturday, 6/7/2025 @10 AM ET
Son of Samurai posted an event in Tech Training
untilAll are invited to join in the conversation for all things Appliantological: bidness, customers, tools, troubleshooting, flavorite brewski, whatever. Webcams and microphones are open and live! Also, follow this Calendar Event so you'll get notified of new posts here. Look for the "Follow" button either at the top of the topic on desktop or below the topic on mobile. Who: This workshop is available to everybody, including you! You don't have to be a member of Appliantology to join the fun. When: Saturday, June 7 @10:00 AM Eastern Time. Where: Online via Zoom How: Click here to register. If you're interested, register now. Arrive a couple minutes early to make sure your connection is working. Set a reminder for yourself for this workshop so you don’t miss it. -
Thank you!
-
 Mike74 joined the community
 -
Have a GYE22HMKBES GE french door refrigerator that was in about 5 inches of water while powered. After drying out, refrig powered up but compressor just kept clicking for days ( did not own house at that point) Replaced compressor overload protector which is where water level rose to. Kept same capacitor. Compressor now comes on and stays on as refrig gets kind of cool after two hours but freezer not a blip. Compressor is very warm to hot. Entered tech mode and tested a few items but not sure what im looking for. Wondering if motherboard is at fault since it was powered when hurricane happened. Thanks for any help. Hate to toss a $2000 refrigerator.
-
Whirlpool Dryer Schematic Request
Son of Samurai replied to Peteralward_'s topic in Appliance Service Manual Requests Forum
This is the closest one I found: -
New Appliance Service Manual added: Whirlpool YLER764 Dryer Tech Sheet
Son of Samurai posted a topic in Appliance Service Manual Requests Forum
Whirlpool YLER764 Dryer Tech Sheet View File PUB 8528191 Submitter Son of Samurai Submitted 05/28/2025 Category Appliance Repair Manual Pot Luck Supper -
Whirlpool YLER764 Dryer Tech Sheet
Son of Samurai posted a file in Appliance Repair Manual Pot Luck Supper
-
Tech sheet needed
Son of Samurai replied to DStenoien's topic in Appliance Service Manual Requests Forum
Domo, Captain! -

New Appliance Service Manual added: Electrolux ECCI3668AS Cooktop Service Data Sheet
Captain Dunsel posted a topic in Appliance Service Manual Requests Forum
Electrolux ECCI3668AS Cooktop Service Data Sheet View File Pub Service Data Sheet A00498610 Pub Parts List 5995725677 Submitter Captain Dunsel Submitted 05/28/2025 Category Appliance Repair Manual Pot Luck Supper -
Electrolux ECCI3668AS Cooktop Service Data Sheet
Captain Dunsel posted a file in Appliance Repair Manual Pot Luck Supper
-
Tech sheet needed
Captain Dunsel replied to DStenoien's topic in Appliance Service Manual Requests Forum
Uploading tech sheet, parts list and waiting on approval: -
 TadTV joined the community
 -
Manufacturer: Electrolux Type of Appliance: Cooktop Model Number: ECCI3668AS Have you validated the model number at an online parts site like Repair Clinic? (yes or no): Yes Have you watched the video on how to search for manuals and have you searched the Downloads section prior to posting this request? (yes or no): Yes I am in need of a tech sheet or service manual for this cooktop. Thank you.
-
Whirlpool Dryer Schematic Request
Captain Dunsel replied to Peteralward_'s topic in Appliance Service Manual Requests Forum
Not coming up with a wiring diagram for you on this one! -

KitchenAid DW - KUDE70FVSS1 Touchpad Issues?
BobbyC777 replied to BobbyC777's topic in DIY Appliance Repair Help
Thanks. There is a 15-pin ribbon cable between the touchpad and the main control board. So when you say "three wires" I'm not sure we are talking about the same parts. And the only display are the lights on the buttons plus the Washing/Drying/Sanitized/Clean indicators. -

Whirlpool Dryer Schematic Request
Peteralward_ posted a topic in Appliance Service Manual Requests Forum
Manufacturer: Whirlpool Type of Appliance: DRYER Model Number: YLER7647EQ2 Have you validated the model number at an online parts site like Repair Clinic? (yes or no): YES Have you watched the video on how to search for manuals and have you searched the Downloads section prior to posting this request? (yes or no): YES Thanks -

New Appliance Service Manual added: GE Dryer Service Bulletin - No Heat
StaggsHomeAppliance replied to Samurai Appliance Repair Man's topic in Appliance Service Manual Requests Forum
That's what I'm wondering. -

KitchenAid DW - KUDE70FVSS1 Touchpad Issues?
Nathaniel Peterson replied to BobbyC777's topic in DIY Appliance Repair Help
Displays on these usually go bad from water infiltration. Have to check for 14 volts between the three wires going to the display while it's acting up. -

Can’t find tech and specs anywhere
Josh Rosenbaum replied to Josh Rosenbaum's topic in Appliance Service Manual Requests Forum
You guys are awesome!! -
Midea Refrigerator E6 Error Code
StaggsHomeAppliance replied to StaggsHomeAppliance's topic in Appliance Service Manual Requests Forum
I know this wasn't posted in the Appliance Repair Forum but I wanted to add that broken wires in the wiring harness on the deli drawer was the cause of the E6 error code. Reminds me of the KitchenAid 5 door nightmare. -
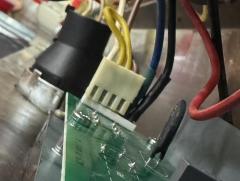
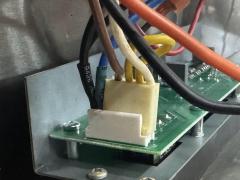
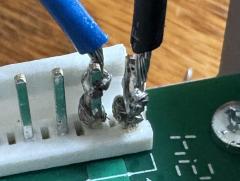
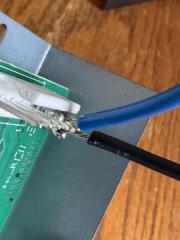
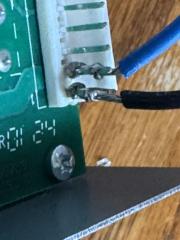
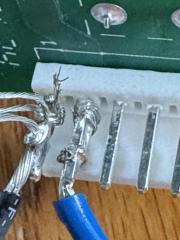
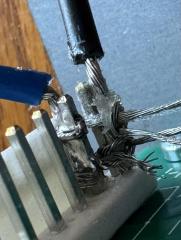
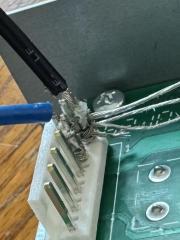
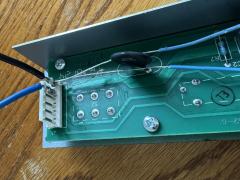
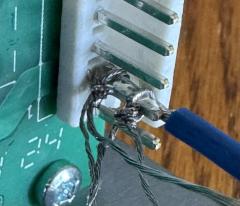
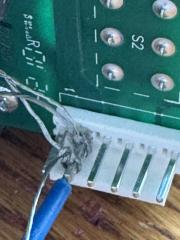
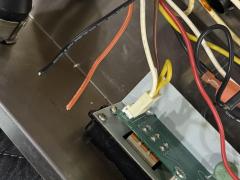
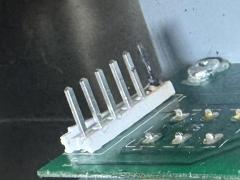
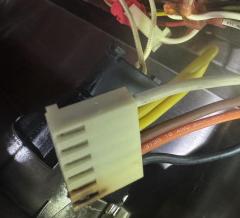
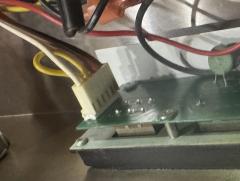
Had an exhaust hood model PIK45 with the wire harness NLA. Two of the wires in the 6 pin connector were crispy. My plan was to cut out the 2 bad wires and solder new wires onto the new control board and use the existing molex connector adjacent to the 2 new wires I soldered onto the board. Wasn’t sure if the molex connector would fit after attaching the new wires. Still don’t know, however I will update once I go back. ideally I would prefer to depin the wires in the molex connector, replace the connector and add new connections onto the cut wires and restore the harness to its original. Problem being that I have no idea where to get such molex connectors and I have yet to see any youtube videos or instructions on this particular repair. I have attached photos of the repair. Do you guys think this will work? Is there a better way? Thanks
-
-

Testing Knipex 85 51 180A "Spring Hose Clamp Pliers" vs. ERP KP-2 Hose Clamp Pliers
fillthebarman commented on Rhubarb Tau's blog entry in Rhubarb Tau's Sloggy Vlog Blog Bog
I replace the spring clamps with screw down hose clamps most of the time.


Announcements
-
Blog Entries
-
By Rhubarb Tau in Rhubarb Tau's Sloggy Vlog Blog Bog0 comments
-
By Son of Samurai in Appliance Repair Tech Tips0 comments
-
 2 comments
 -
-
By Son of Samurai in Appliance Repair Tech Tips1 comment
-
-
Topics
-