
FAQs | Repair Videos | Academy | Newsletter | Contact
-
Upcoming Events
No upcoming events found
All Activity
- Past hour
-
 sgxzm joined the community
 - Today
-

Can’t find tech and specs anywhere
Josh Rosenbaum replied to Josh Rosenbaum's topic in Appliance Service Manual Requests Forum
You guys are awesome!! -

Midea Refrigerator E6 Error Code
StaggsHomeAppliance replied to StaggsHomeAppliance's topic in Appliance Service Manual Requests Forum
I know this wasn't posted in the Appliance Repair Forum but I wanted to add that broken wires in the wiring harness on the deli drawer was the cause of the E6 error code. Reminds me of the KitchenAid 5 door nightmare. -
 Roberto63 joined the community
 -
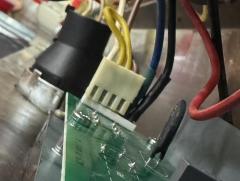
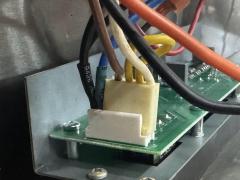
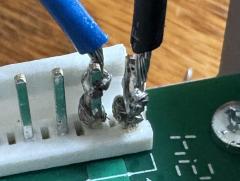
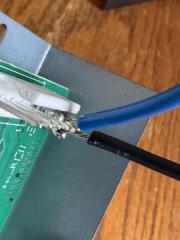
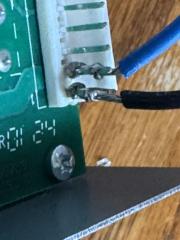
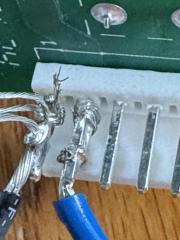
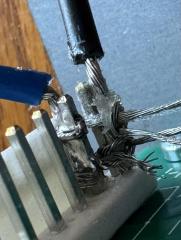
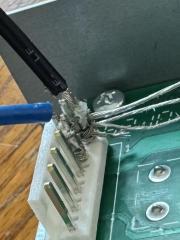
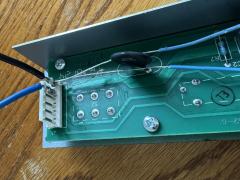
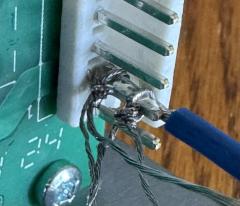
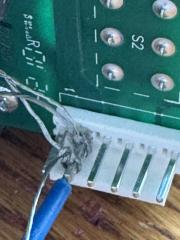
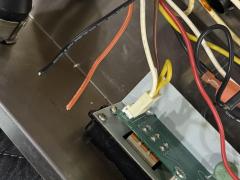
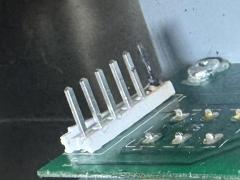
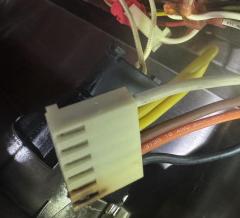
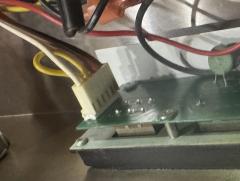
Had an exhaust hood model PIK45 with the wire harness NLA. Two of the wires in the 6 pin connector were crispy. My plan was to cut out the 2 bad wires and solder new wires onto the new control board and use the existing molex connector adjacent to the 2 new wires I soldered onto the board. Wasn’t sure if the molex connector would fit after attaching the new wires. Still don’t know, however I will update once I go back. ideally I would prefer to depin the wires in the molex connector, replace the connector and add new connections onto the cut wires and restore the harness to its original. Problem being that I have no idea where to get such molex connectors and I have yet to see any youtube videos or instructions on this particular repair. I have attached photos of the repair. Do you guys think this will work? Is there a better way? Thanks
-
-
 Sergtech joined the community
 -

Testing Knipex 85 51 180A "Spring Hose Clamp Pliers" vs. ERP KP-2 Hose Clamp Pliers
fillthebarman commented on Rhubarb Tau's blog entry in Rhubarb Tau's Sloggy Vlog Blog Bog
I replace the spring clamps with screw down hose clamps most of the time. - Yesterday
-

Beko Dishwasher service manual?
dfphoto replied to dfphoto's topic in Appliance Service Manual Requests Forum
@Son of Samurai you're so good!!!! appreciate the work!!! -

Beko Dishwasher service manual?
Son of Samurai replied to dfphoto's topic in Appliance Service Manual Requests Forum
Uses these docs: -
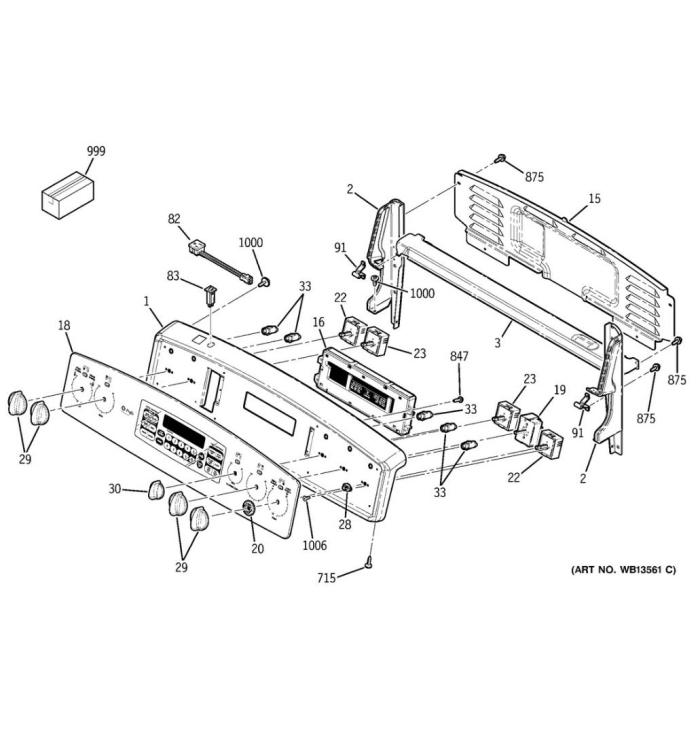
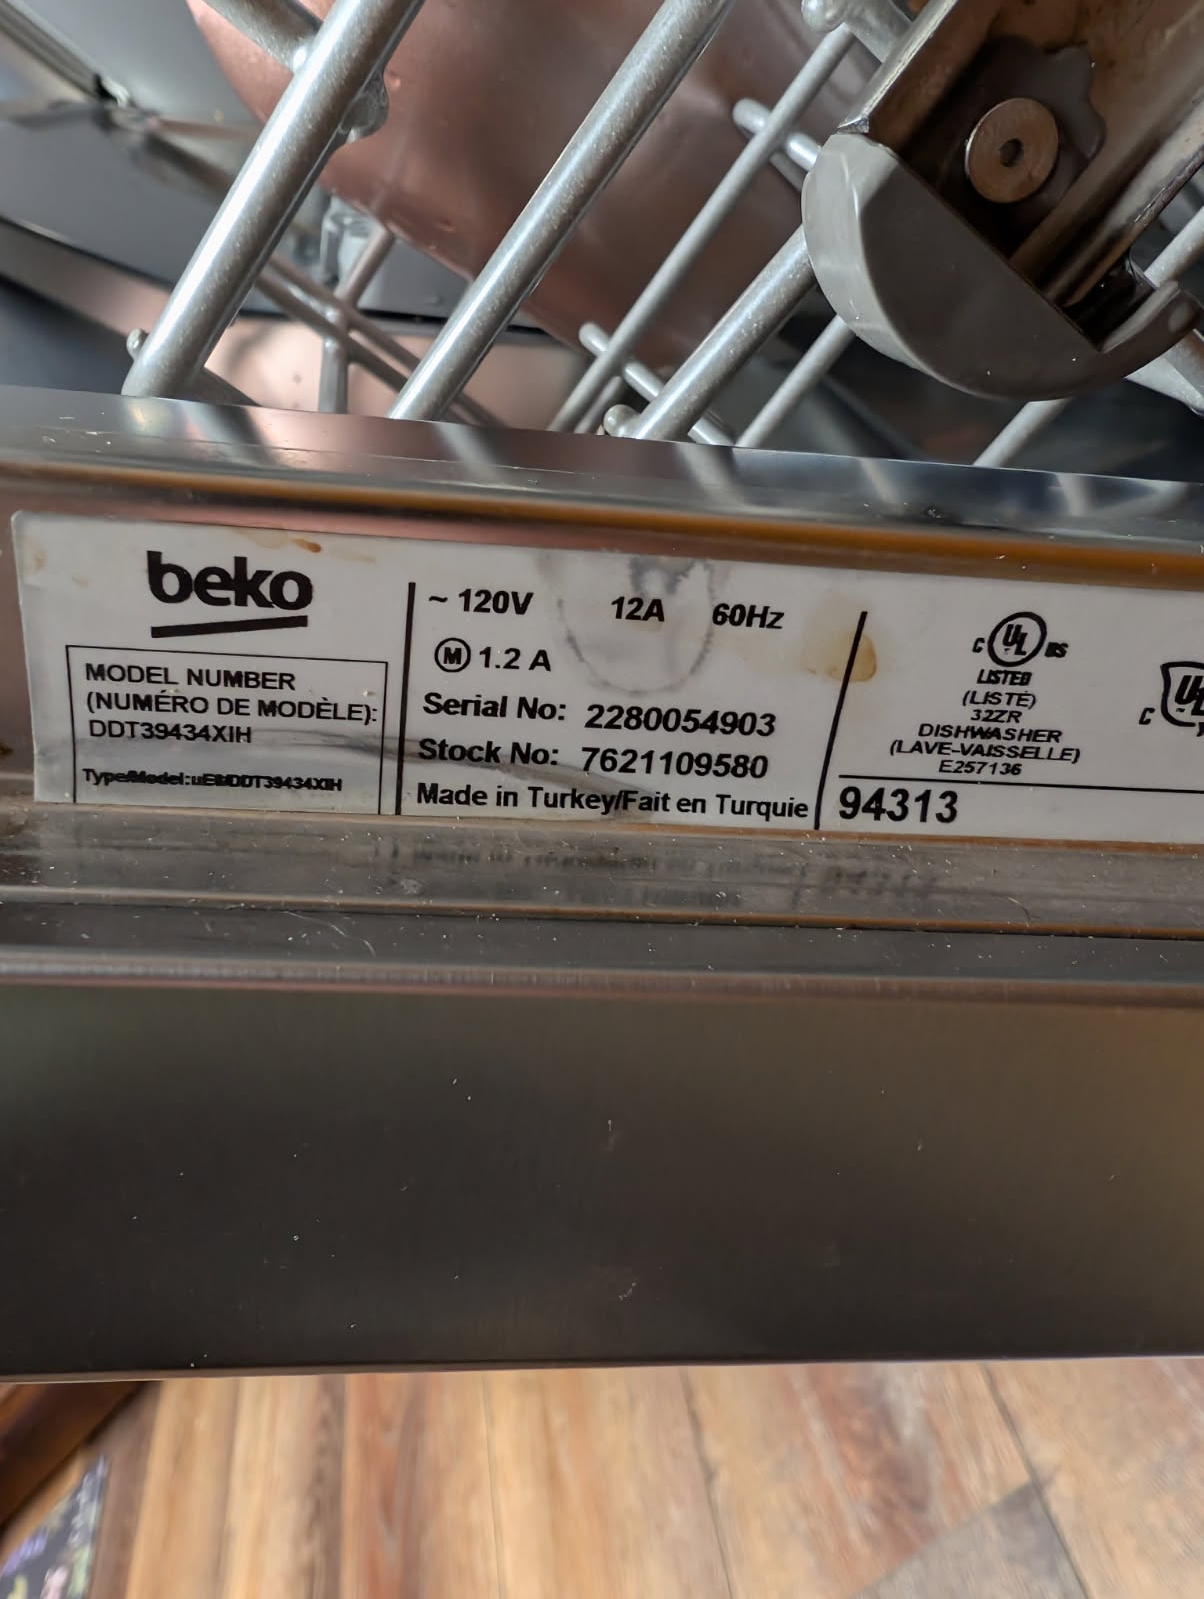
New Appliance Service Manual added: Beko DDT39434XIH 7621109580 Dishwasher Tech Bundle
Son of Samurai posted a topic in Appliance Service Manual Requests Forum
Beko DDT39434XIH 7621109580 Dishwasher Tech Bundle View File Troubleshooting doc PUB 822803 Service test mode PUB 822804 settings menu PUB 822805 error code list PUB 822806 disassembly PUB 1759910002 schematic PUB 1759930001 Submitter Son of Samurai Submitted 05/27/2025 Category Appliance Repair Manual Pot Luck Supper -
Beko DDT39434XIH 7621109580 Dishwasher Tech Bundle
Son of Samurai posted a file in Appliance Repair Manual Pot Luck Supper
-
Manufacturer: Beko Type of Appliance: dishwasher Model Number: DDT39434XIH Have you validated the model number at an online parts site like Repair Clinic? (yes or no): y Have you watched the video on how to search for manuals and have you searched the Downloads section prior to posting this request? (yes or no): y Hello all, wondering if you have any Beko manuals DDT39434XIH as usual very thankful!

-
 Rey Reynante joined the community
 -
 Residential Appliance Technician joined the community
 -
 Anthony.H joined the community
 -

GE Profile Range - Oven now heats VERY slowly
Alanna Farrell replied to DIY_Hopefully's topic in DIY Appliance Repair Help
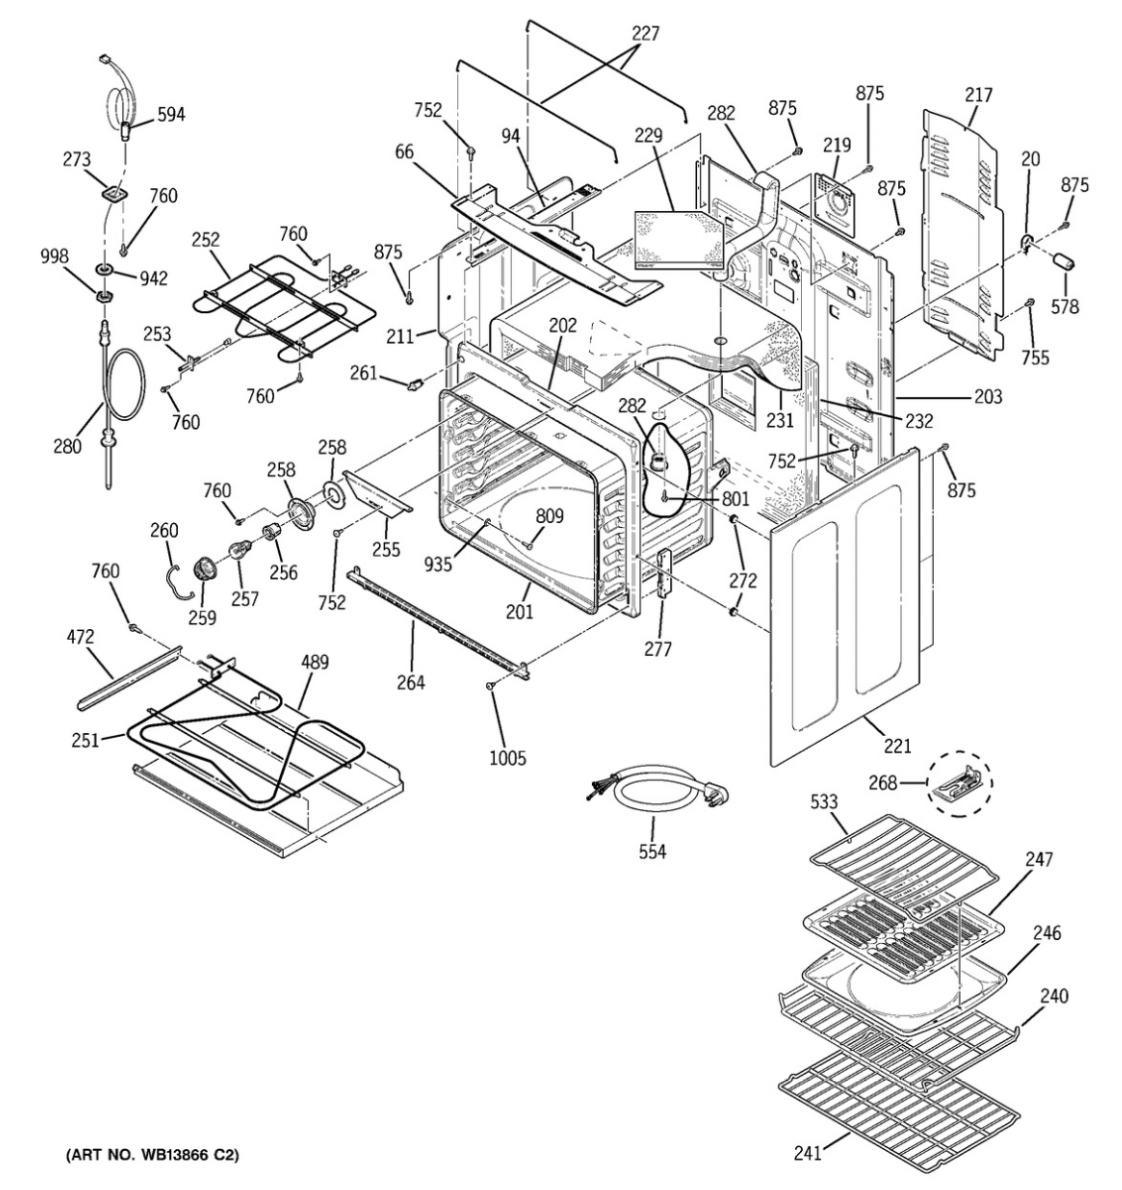
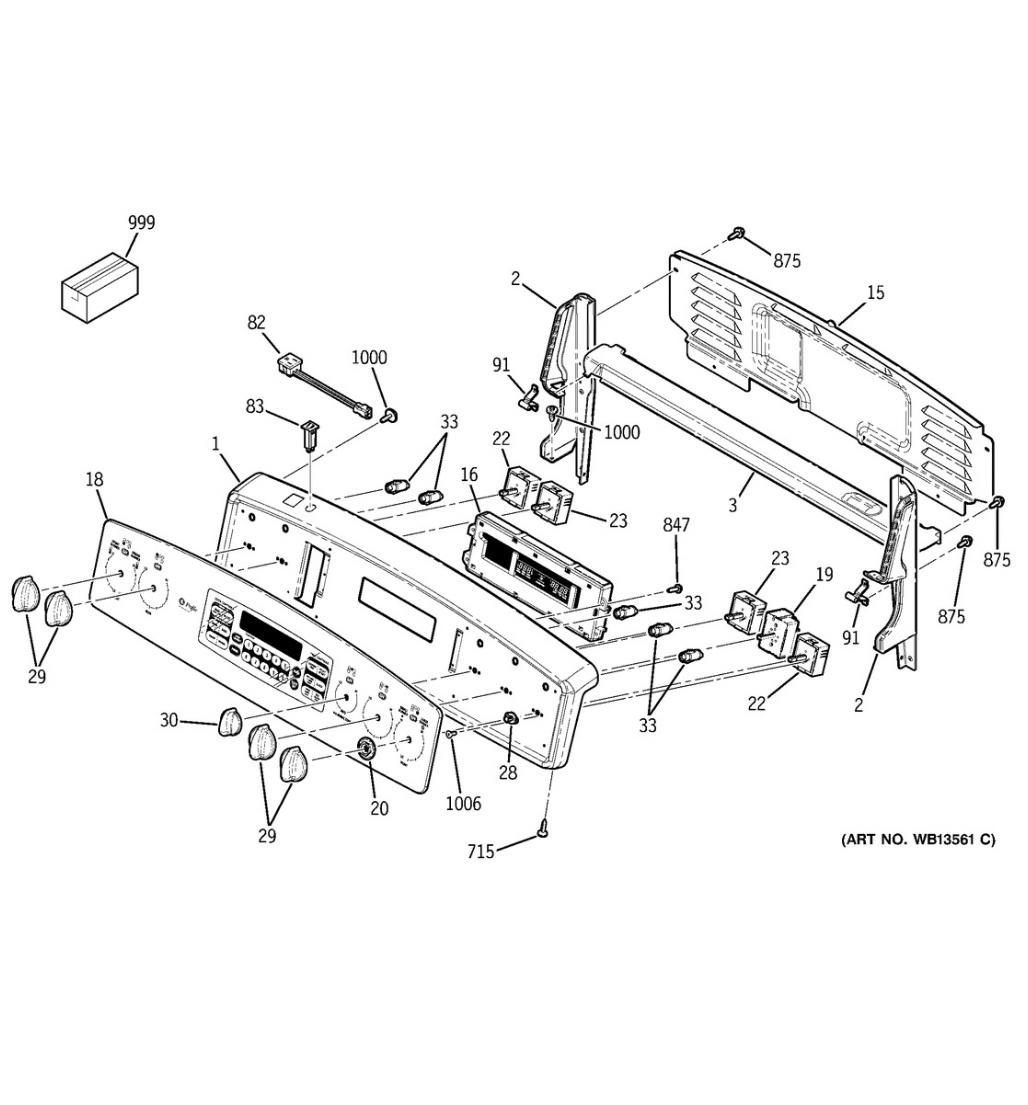
A slow-heating oven like your GE Profile JB910B LGSS often points to a failing or partially working bake element—even if it's hidden and still producing some heat. Since it eventually reaches temperature but takes unusually long, the element may be damaged or not getting full voltage due to a weak relay, faulty sensor, or control board issue. That spark from the food spill near the convection fan could have caused shorting or internal damage. Start by checking the bake element continuity with a multimeter (you’ll likely need to pull the oven out and access it from the back panel). If the element tests fine, the temperature sensor or control board may be the culprit. A full visual inspection behind the rear panel should reveal any obvious damage or disconnected wiring. -
Service Manual needed for Bosch Dryer WTG86402UC/01 - not sure if the manuals already listed are compatible with this model
Son of Samurai replied to McLoughlin132's topic in Appliance Service Manual Requests Forum
Uses this bundle: And this schematic: -

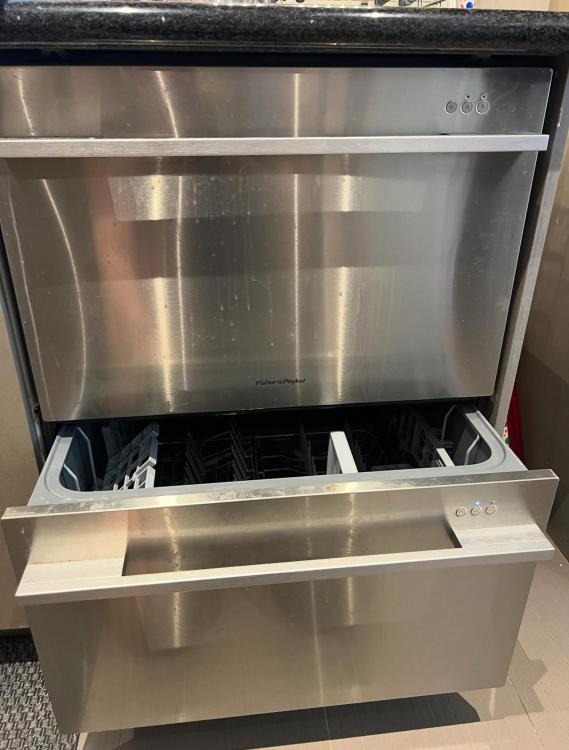
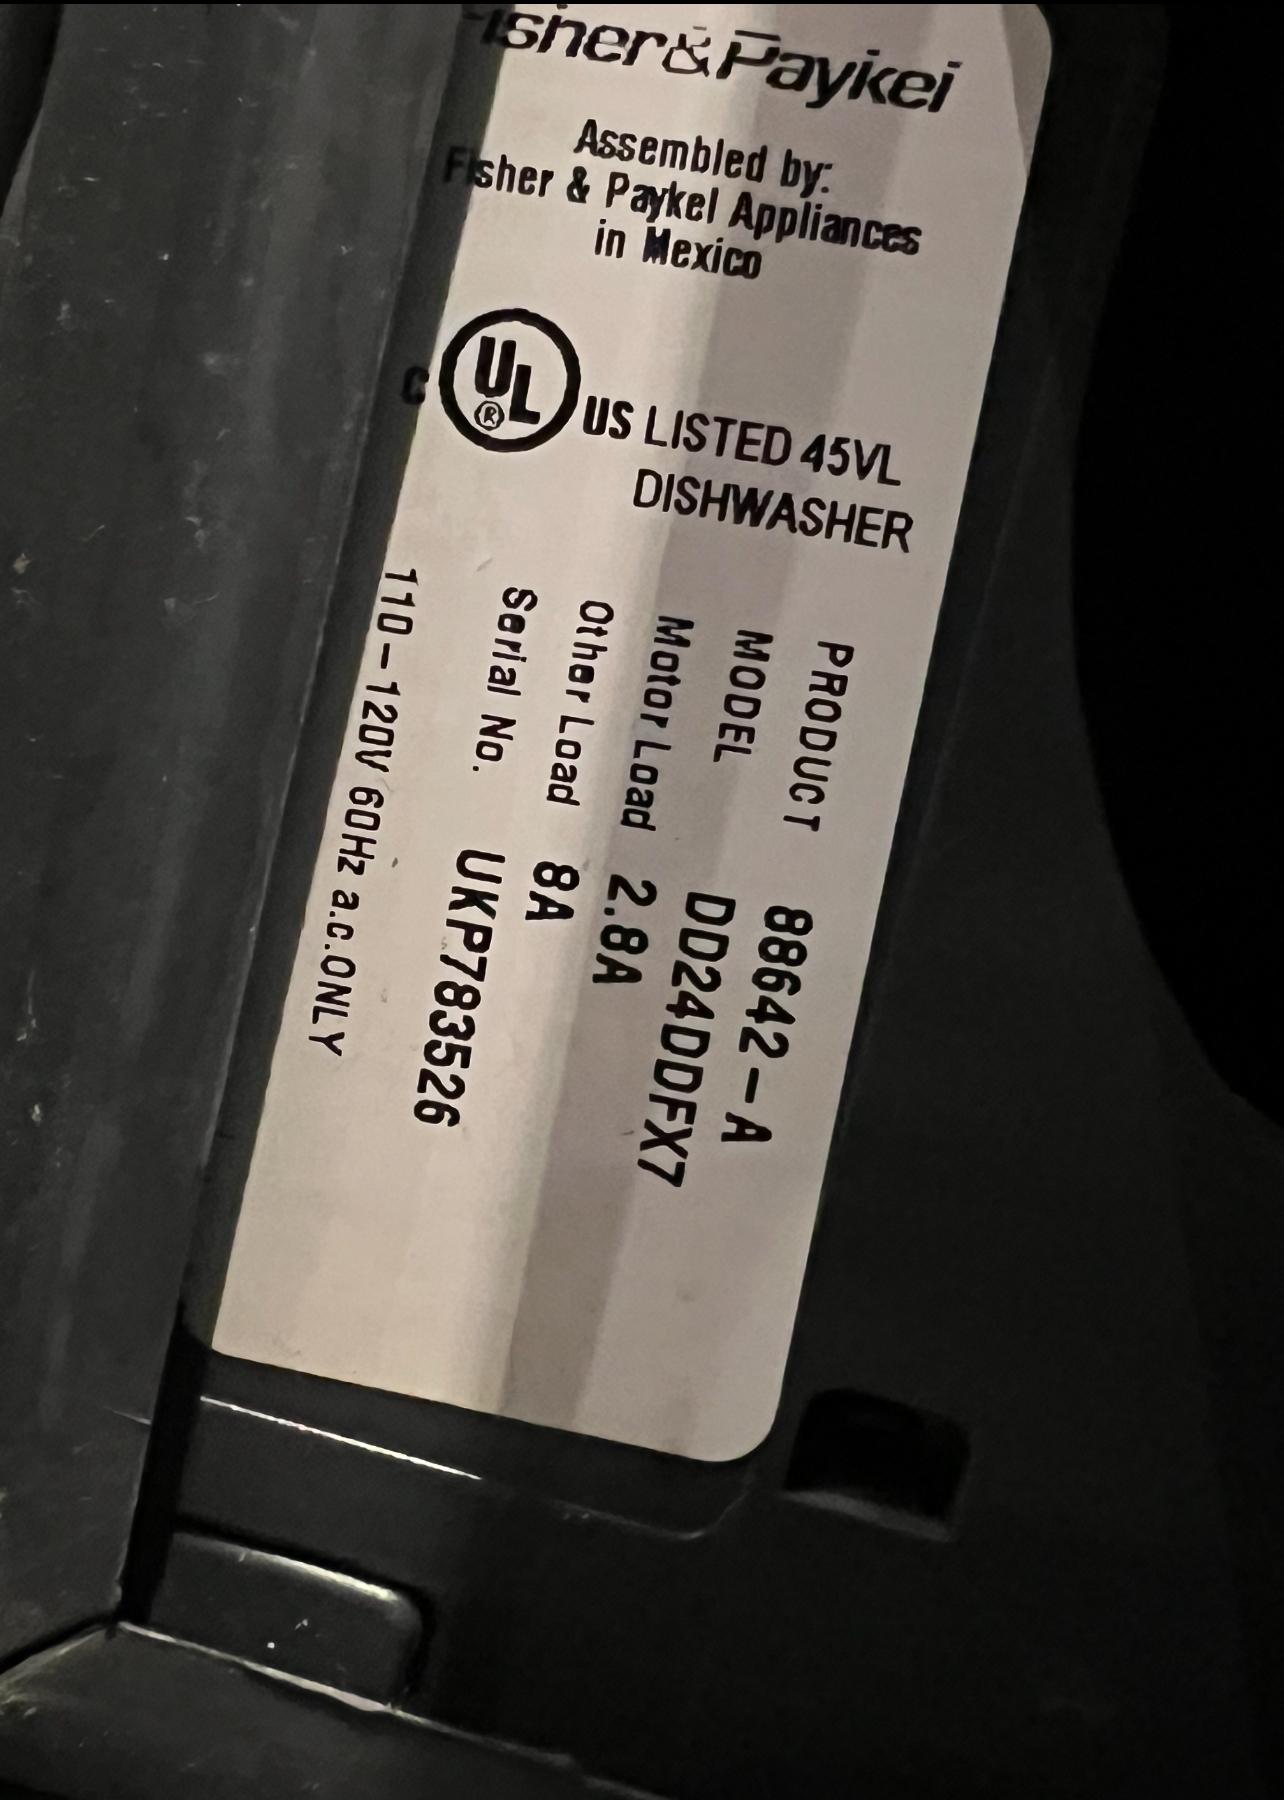
Looking for the Service Manual for the DD24DDFX7 Fisher&Paykel dishwasher.
Captain Dunsel replied to Adrian_C's topic in Appliance Service Manual Requests Forum
Only see this one:- 1 reply
-
- 1
-
.png)
-

GE Profile Range - Oven now heats VERY slowly
Akshesh replied to DIY_Hopefully's topic in DIY Appliance Repair Help
Check this video similar to your Range. Also, I see attached exploded view of parts. But please double-check as this is for the closest model number match. Check 4 parts mentioned below for this issue: 1) Bake Element 2) Broil Element 3) Oven Temperature Sensor 4) Oven Control Board
-
 Manufacturer: Fisher&Paykel Type of Appliance: Dishwasher Model Number: DD24DDFX7 Have you validated the model number at an online parts site like Repair Clinic? (yes or no): Yes Have you watched the video on how to search for manuals and have you searched the Downloads section prior to posting this request? (yes or no): Yes Hello, Looking for the Service Manual for the DD24DDFX7 Fisher&Paykel dishwasher. The closest manual I found here doesn’t match the UI of my model. (mine has only 3 buttons and no display) Thank you!!!
-
 redd.ussr joined the community
 -

Fridge WRS321SDHZ08 "Adaptive Defrost Controller" function not working, anyone understands its inner workings?
MrApplianceMatt replied to huron's topic in DIY Appliance Repair Help
These harnesses go bad too. The thermal fuse cuts out. I have also seen a few with evap thermistors showing 50 degrees while buried in ice. I have found in these SxS units that they will sometimes seem to default to timed defrost if the thermistor is unplugged. I have also seen the backed out connector on these and given my experience with them I typically quote the harness and the thermistor regardless of which of those 3 failures occurred because the harness and the thermistor have updated part numbers. - Last week
-
Fridge WRS321SDHZ08 "Adaptive Defrost Controller" function not working, anyone understands its inner workings?
Econo Appliance replied to huron's topic in DIY Appliance Repair Help
Thank you for updating, the more information the better! I have repaired two of this model now, both were not defrosting. One was electronic board, the other was a loose wire in the harness just above the evaporator. Give all the plugs and connectors a gentle tug. I have a feeling we will start to see many more of these. -
 Manufacturer: BOSCH Type of Appliance: DRYER Model Number: WTG86402UC/01 Have you validated the model number at an online parts site like Repair Clinic? (yes or no): YES Have you watched the video on how to search for manuals and have you searched the Downloads section prior to posting this request? (yes or no): YES Thanks for any help, much appreciated.
 -
Can’t find tech and specs anywhere
Son of Samurai replied to Josh Rosenbaum's topic in Appliance Service Manual Requests Forum
Domo, Captain! -
New Appliance Service Manual added: GE GTX18GSSJ1WW Dryer Mini Manual
Captain Dunsel posted a topic in Appliance Service Manual Requests Forum
GE GTX18GSSJ1WW Dryer Mini Manual View File Pub 31-16293 Submitter Captain Dunsel Submitted 05/26/2025 Category Appliance Repair Manual Pot Luck Supper -
GE GTX18GSSJ1WW Dryer Mini Manual
Captain Dunsel posted a file in Appliance Repair Manual Pot Luck Supper
-
Can’t find tech and specs anywhere
Captain Dunsel replied to Josh Rosenbaum's topic in Appliance Service Manual Requests Forum
Uploading mini manual and waiting on approval: -

Model tag missing on vintage GE Filter Flo 3 speed 14 washer w/ broken Assister
Budget Appliance Repair replied to SVeig's topic in DIY Appliance Repair Help
@SVeig The coupling that is stripped out is in the top of your agitator. You have to cut the circle of plastic out in the top so that you can drive what is left of the agitator coupling out of the agitator and clean any remaining rubber out of the spline slots in the agitator. All the parts that are still on the transmission look to be OK and the transmission agitator splines look in good shape. To install the new coupling you would put it onto the agitator shaft of the transmission, soap up the rubber splines and drive the agitator back onto the new coupling. -

Fridge WRS321SDHZ08 "Adaptive Defrost Controller" function not working, anyone understands its inner workings?
isaacjc replied to huron's topic in DIY Appliance Repair Help
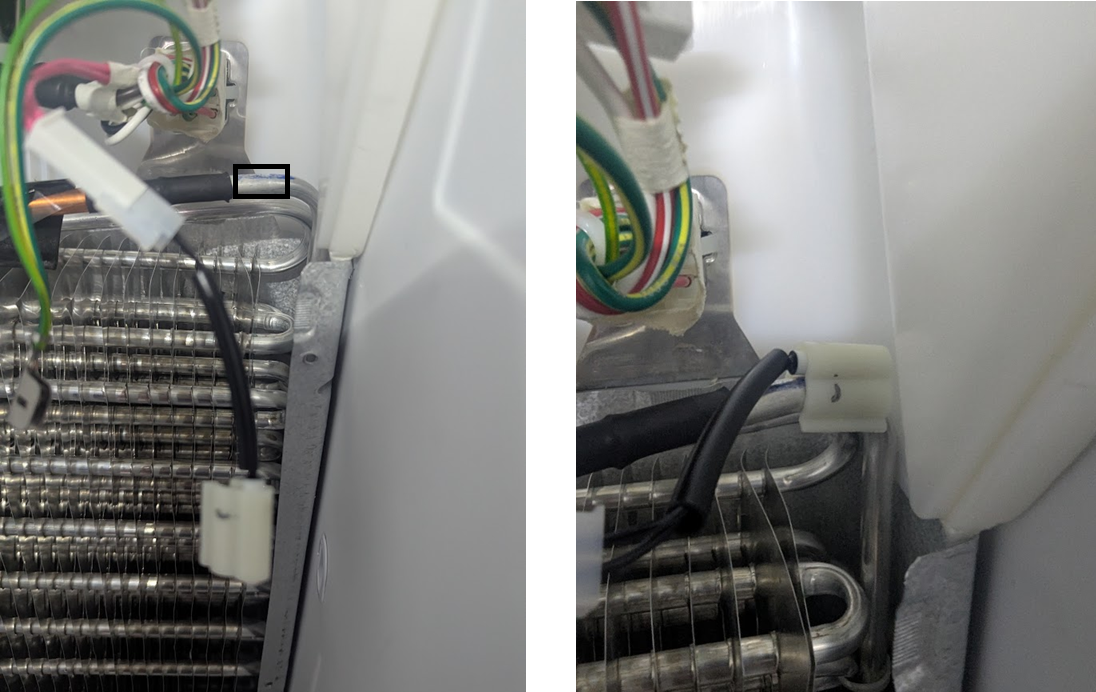
Sorry for the late response here, hope you see this. I replaced my thermistor (the one near the evap fan motor on April 10th, so far, so good. I did not zip-tie the thermistor directly to the coil like others have suggested. I STILL haven't put all the shelves back yet because they were a pita to remove, but so far so good and no ice buildup. Here is a link to the part I purchased: https://a.co/d/aUt1Elq oh one more thing to note! I actually moved the thermistor over a tad from where it was, it was closer to the rounded turn of the coil, I moved it so it was more on the straight part of the coil, I was hoping it just wasn't making a good connection in addition to being bad. Anyway, I apparently don't have a picture of the new one on in the new spot, but I tried to highlight it in a box there for you. Hope it helps!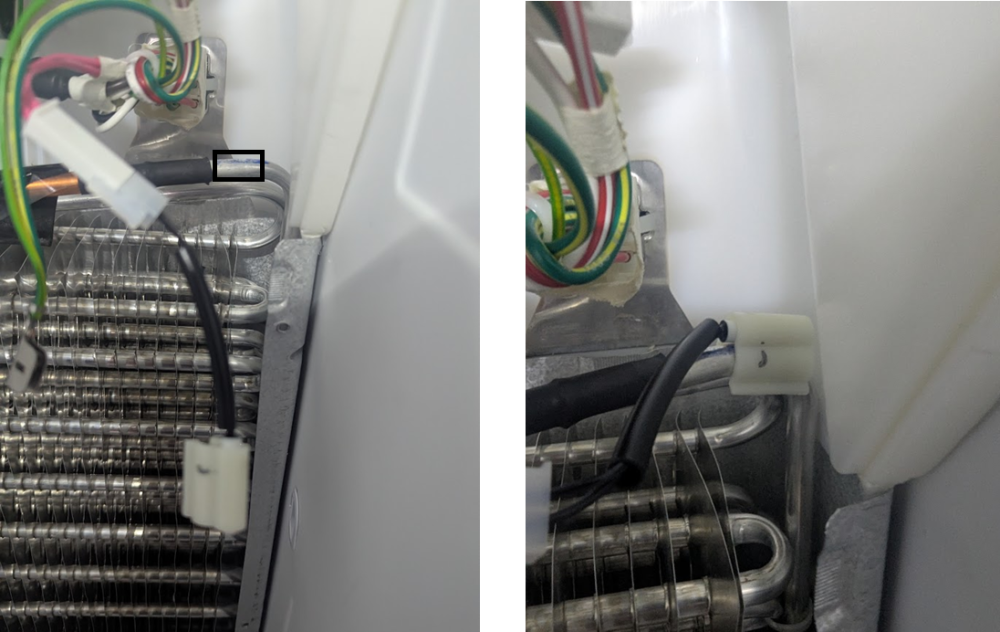
-
Can’t find tech and specs anywhere
Josh Rosenbaum posted a topic in Appliance Service Manual Requests Forum
Manufacturer: GE Type of Appliance: Dryer Model Number: GTX18GSSJ1WW Have you validated the model number at an online parts site like Repair Clinic? (yes or no): yes Have you watched the video on how to search for manuals and have you searched the Downloads section prior to posting this request? (yes or no): yes cant find anything -

GE dryer dead
zac flota commented on Koi Guy's blog entry in Koi Guy's Amazing Compendium of Timeless Appliantological Wisdom
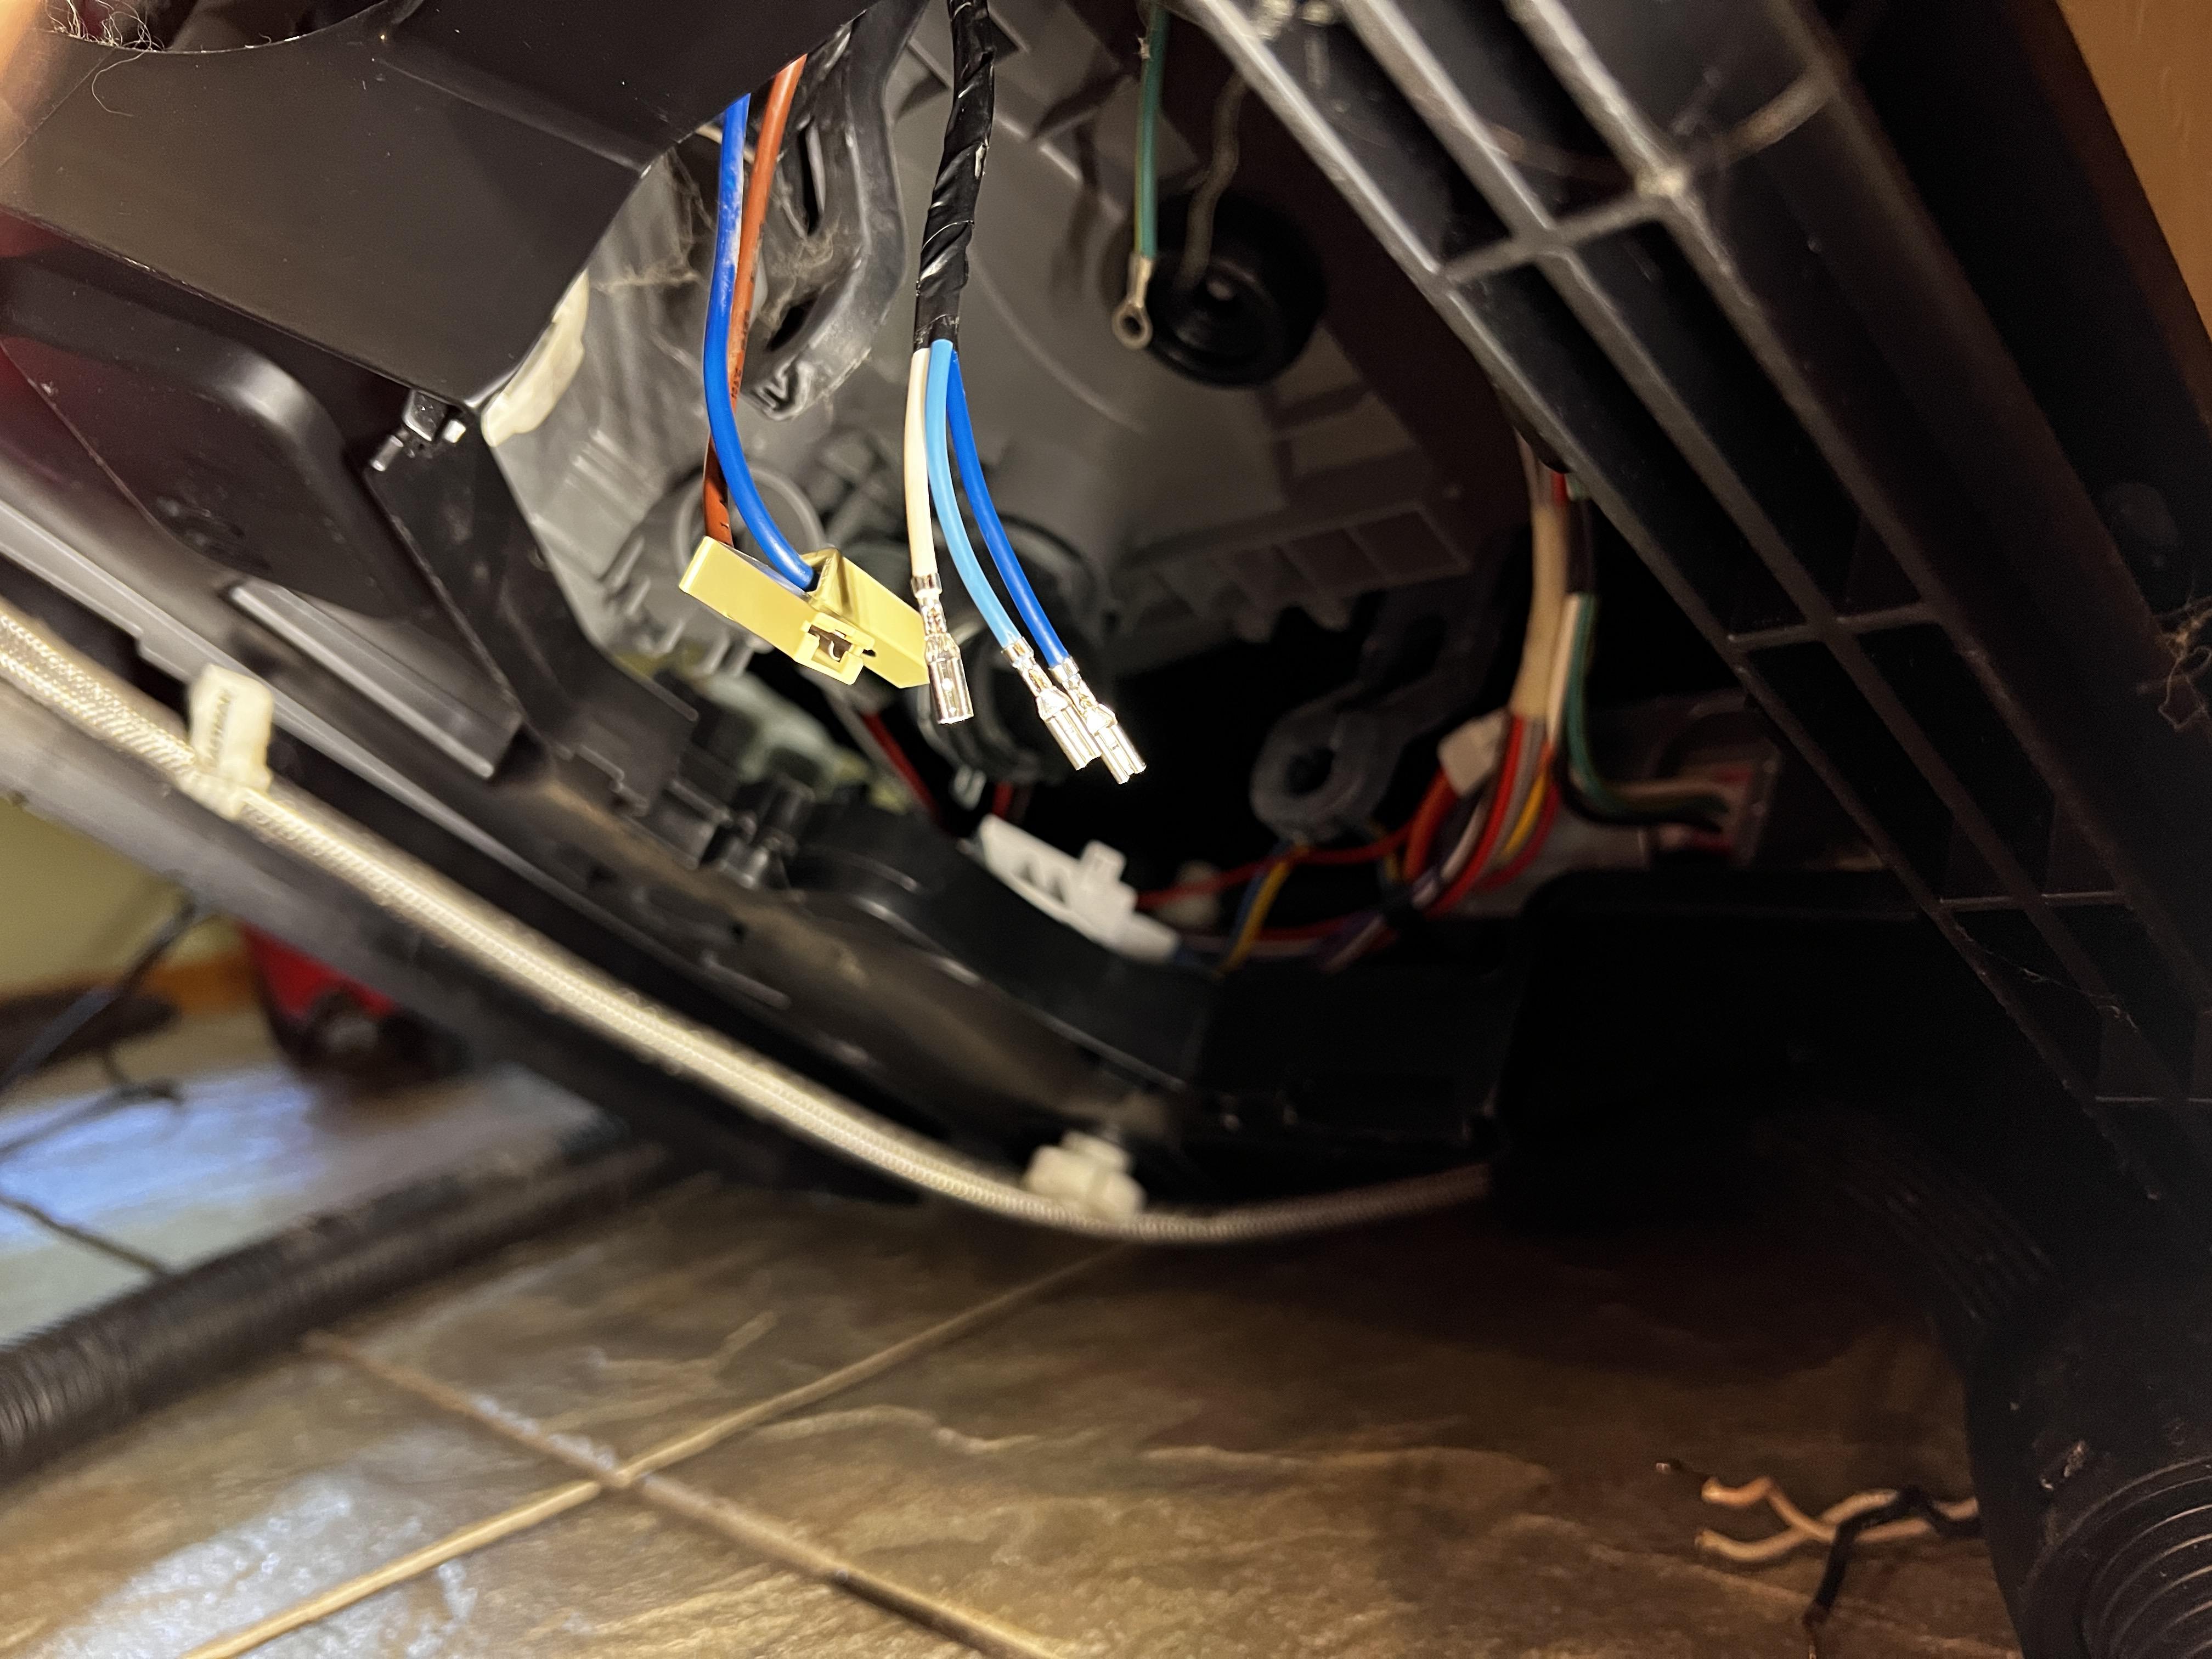
Ive have repaired very similar failures twice with new hi limit and reterminating, but both times its been a Samsung . I usually use something like non insulated generic female crimp connector. Typical sizes seem easy to source but alot of terminals you buy from amazon ( Ive tried plenty) dont seem high quality. Im specifically talking about non insulated quick disconnects. Im wondering what you use specifically because your work is top notch. (I'm sure you're sick of hearing about it) I have a hasstronica crimper w/interchangeable dyes and klien manual dyke style crimper. I have all kinds of butt splices and nylon/ heatshrink / heavy duty tape wraped paper clips that ive used to jump switches and repair wires but when i really try to finesse my splicing game ive been dissatisfied. Especially with smaller gauge wire. My recent dilemma was on an LG dishwasher circulation pump that had burned out its quick connect plug so badly that when i disconnected it, I destroyed the molex. Looking closely at the female terminations i noticed they looked like a common size. I attached a photo of what i did but the stranded wiring seemed to be thin and my crimping tool provided an ok connection that i had to reinforce with my manual klien tool. This has stood the test of time so far but for such an obvious repair im asking do you have speciality terminals you use past a common size or do you recommend replacing actual harness ?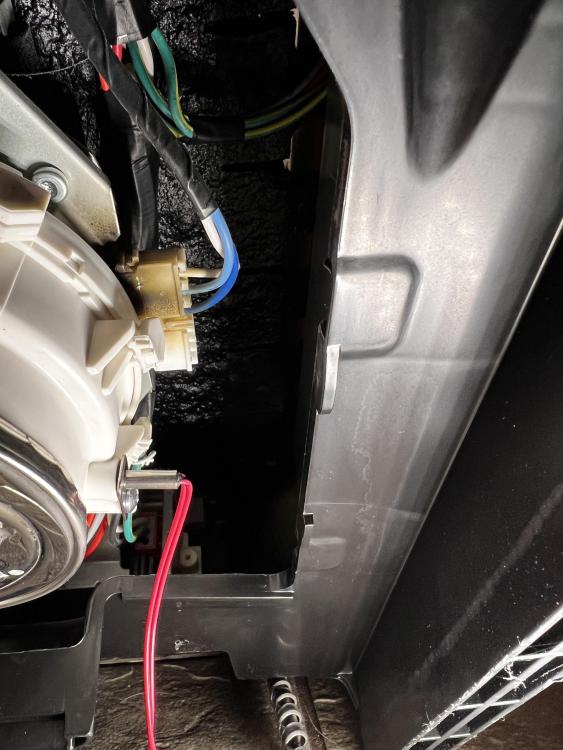


Announcements
-
Blog Entries
-
 2 comments
 -
-
By Son of Samurai in Appliance Repair Tech Tips1 comment
-
 By Rhubarb Tau in Rhubarb Tau's Sloggy Vlog Blog Bog2 comments
 -
By Rhubarb Tau in Rhubarb Tau's Sloggy Vlog Blog Bog1 comment
-
-
Topics
-
-
-
-
0
Son of Samurai · Started
-

-