How to Correctly Measure Dryer Vent Airflow
The general rule for dryer vent airflow is that, if the airflow feels like a breath (even a strong one), then you have a problem. This rule of thumb will serve you well a lot of the time, but sometimes a "calibrated palm" just isn't enough. Sometimes, you need to get an actual measurement of the airflow so that you can compare it to the specifications.
What you really want to know is the volumetric flow rate of the dryer exhaust. That is, how much air it's pushing out over a particular period of time. That's a difficult thing to measure directly, so what we do instead is measure velocity and use that to calculate volumetric flow.
Let's break down how we do that.
The easiest way to measure a vent's velocity is by using an anemometer. You can get these relatively inexpensively at places such as Amazon -- for instance, look at this one: https://amzn.to/2uLJjBP
We use miles per hour (MPH) when we're talking about velocity. And that's exactly what your anemometer will tell you: how fast is the air moving. But you can't calculate volumetric flow rate if you only know velocity. You need to also know how wide your vent tubing is. Fortunately, dryer venting is pretty standard. The tubing is almost always 4 inches in diameter.
Once you know both the diameter of the tubing and the air velocity, you're ready to calculate your volumetric flow rate, which is measured in cubic feet per minute (CFM). You can calculate it easily by using an online calculator, like this one: https://www.engineering.com/calculators/airflow.htm
NOTE: When that calculator asks for the width of a circular duct, it asks for the radius, not the diameter. The radius is always half the diameter, so if you have a 4 inch wide duct, that's a radius of 2 inches.
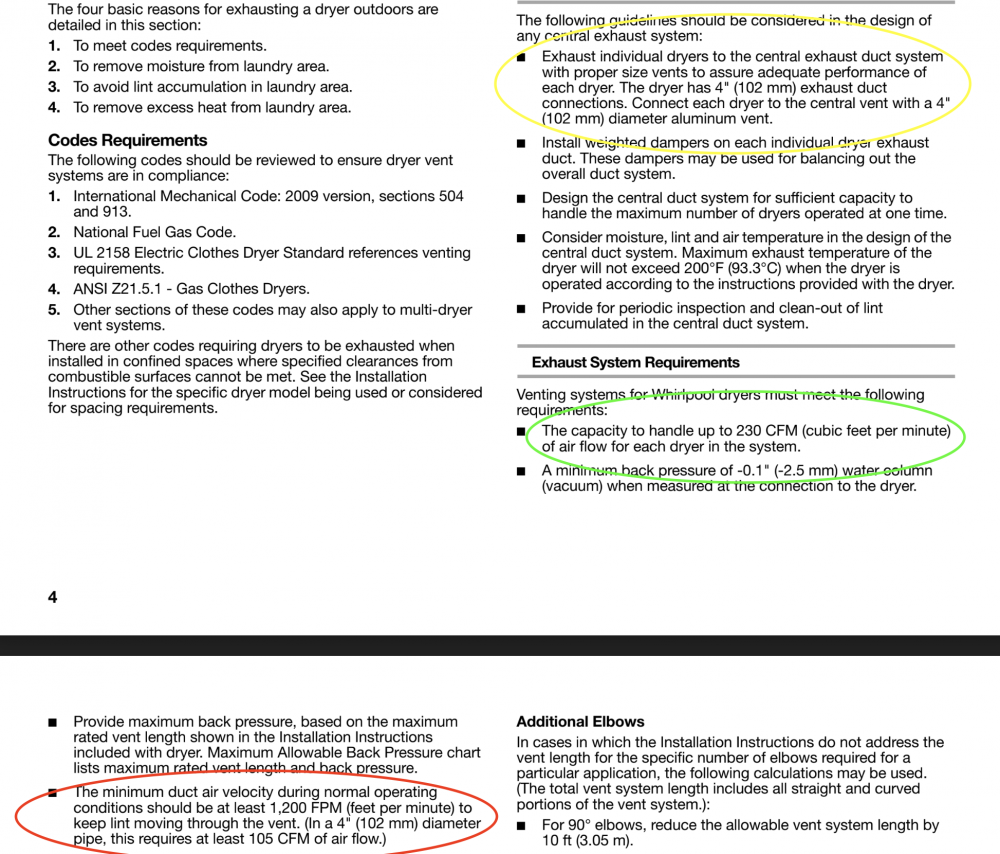
So now you know how to calculate how many CFM that vent is pushing out! But what spec do you compare that to? Check out the circled bits below:
This is from a Whirlpool dryer manual, but these specs apply to basically all dryers. The technology just doesn't vary that much.
In yellow, you can see that 4 inch diameter vent spec. In green, the maximum CFM that the venting system needs to be able to handle. And then in red, you can see the minimum CFM that your dryer vent should be able to push out.
So, for a healthy, 4 inch diameter vent, you should get at least 105 CFM. And that's a general spec you can apply to any model of dryer. You now know your spec!
Let's run through a quick example.
My anemometer reads 10 MPH coming out of the dryer vent. I've confirmed that my dryer vent is 4 inches in diameter. Is that measurement within spec or not? Well, a quick calculation using the tool I linked above (making sure that I put in 2 inches for the radius), and I get... 76.8 CFM. That's way below spec!
Here's another publication from Whirlpool on dryer venting specifications. Again, even though it's a Whirlpool document, it applies to all dryers. One nice thing about this publication is that it includes specs on dryer vent back pressures. This is very useful for situations where you don't have easy access to the dryer vent exhaust hood such as high rise apartment buildings or roof vents. In these cases, instead of using an anemometer at the exhaust hood, you would use a different instrument called a manometer to measure back pressure right at the vent where it attaches to the dryer. The maximum allowable backpressure is 0.6 "wc (inches of water column).
So there you have it: a simple and objective way to determine dryer vent health using one inexpensive tool and a tiny bit of math. Want to learn more about troubleshooting laundry appliances with precision and certainty? Click here to check out the Washer and Dryer Repair Course over at Master Samurai Tech.
-
.png) 9
9
-
 4
4


18 Comments
Recommended Comments