FAQs | Repair Videos | Academy | Newsletter | Contact
Search the Community
Showing results for tags 'schematic'.
-

Maytag Electric Dryer Motor Stops Running After Start Switch is Released
Samurai Appliance Repair Man posted a blog entry in Samurai Appliance Repair Man's Blog
In this recent Live Dojo appliance troubleshooting workshop, we workshopped a problem with a Maytag dryer where it would start but stop running as soon as the start button was released. We looked at how the motor's start circuit works-- how it's configured before starting and how it changes after the motor is started and running. Finally, we compared this start configuration with the Whirlpool push to start (PTS) relay system. Become a tech member at Appliantology and join in on the conversation: https://appliantology.org/blogs/entry/1027-tech-memberships-at-appliantology/ -

Miele G1000 to G2000 Model Series Dishwasher Schematic Set
Samurai Appliance Repair Man posted a file in Appliance Repair Manual Pot Luck Supper
-
- miele
- dishwasher
-
(and 1 more)
Tagged with:
-
Samsung Dryer Tech Sheet Request
MVrepairs posted a topic in Appliance Service Manual Requests Forum
Manufacturer: Samsung Type of Appliance: Dryer Model Number: DVE45N5300F/A3 Have you validated the model number at an online parts site like Repair Clinic? (yes or no): yes Have you watched the video on how to search for manuals and have you searched the Downloads section prior to posting this request? (yes or no): yes DVE45N5300F/A3 I need the tech sheet for this dryer. Thank you. -
Manufacturer: Electrolux Type of Appliance: Washer Model Number: Eiflw50liw0 Have you validated the model number at an online parts site like Repair Clinic? (yes or no): Yes Have you watched the video on how to search for manuals and have you searched the Downloads section prior to posting this request? (yes or no): Yes Schematic needed thx
-

No-parts field repairs on two dryers with failed timers
Samurai Appliance Repair Man posted a blog entry in Samurai Appliance Repair Man's Blog
I had two service calls recently on two different dryers with the same problem: the motor wouldn't run. These are two different dryers: one an old skool Whirlpool-built unit with the lint filter on the top panel and the other a Maytag Neptune-style dryer. Different disassembly, wiring, and schematics, and completely different timers. But in both cases, the problem was the same--a burnt contact in the timer (failed open so would not close). In the two videos below, I show you how to use the schematic not only to precisely identify the specific failed contact in the timer, but also how to do a field repair to bypass that failed contact and get the dryer safely running again without replacing the timer--all in the first trip. Being able to do these repairs was only possible by understanding how basic electricity and circuits work and by reading the schematics. There is no other way. Well, I guess you could just memorize a bunch of monkey tricks like, "If motor no run on a Maytag Neptune dryer, jumper the yellow and gray wires together." Yeah... good luck with that. What's interesting about these two videos is that the repairs done on each are electrically identical but the physical repair looked entirely different between the two. And that's exactly what you should notice in these two videos. Would you like to be able to troubleshoot like this? You can! These are the kind of skills we teach at the Master Samurai Tech Academy. We're not teaching anything new or pointy-headed, or academic-- these are the skills that most appliance techs used to have 20 years ago but have been largely lost to the trade. That's why you see so many techs out there who don't know how to even begin to troubleshoot an electrical problem and, as a result, the trade is ate up with parts changing monkeys. There is a better way: the Master Samurai Tech way. Start with our Fundamentals course. Don't let the name fool you-- many techs, including those with 20+ years experience do not know what we teach in the Fundamentals course. We know because we've had many students in exactly this situation-- over 20 or even 30 years experience-- take our Fundamentals course and then tell us it was a game changer for them. It can be for you, too. Then, to really kick up your laundry equipment repair skills to 11, take our Washer & Dryer Repair course. You'll be unstumpable! The first video shows the field jumper repair on a Maytag Neptune dryer and the next one is an old skool Whirlpool dryer. Watch and learn.- 12 comments
-
- 4
-
.png)
-
- failed timer
- motor inop
-
(and 5 more)
Tagged with:
-
Manufacturer: GE Type of Appliance: Refrigerator Model Number: GTS16DTHCRBB Have you validated the model number at an online parts site like Repair Clinic? (yes or no): yes Have you watched the video on how to search for manuals and have you searched the Downloads section prior to posting this request? (yes or no): yes Looking for a tech sheet or service manual please. Thanks!
- 2 replies
-
- ge
- refrigrator
-
(and 3 more)
Tagged with:
-

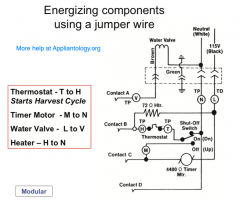
Whirlpool Modular Ice Maker Internal Wiring
Samurai Appliance Repair Man posted a gallery image in The Appliantology Gallery
From the album: Icemaker Repair
Shows the internal wiring and jumper points for energizing various components in and around the ice maker. -
Viking Built-In Electric Wall Ovens Schematics
jvanhorn posted a file in Appliance Repair Manual Pot Luck Supper
Version 1.0.0
125 downloads
Table of Contents: VEDO 27” Electric Wall Oven------------------- G001 VEDO 27” Gas Wall Oven------------------------ G002 VEDO273 Component Testing---------G003 / G006 Schematic Wiring Diagram VEDO273 W. Wall Oven-------------------------- G007 / G008 VESO105 Wiring Diagram (Schematic) Built-in Electric 27” W. Single Wall Oven------ G009 Bake------------------------------------------- G010 Convection Bake---------------------------- G010 Convection Cook---------------------------- G010 Mini-Broil------------------------------------ G010 Maxi-Broil----------------------------------- G011 Convection Broil---------------------------- G011 Clean Initiate--------------------------------- G011 Door Lock Below 575° F.----------------- G011 Door Lock Above 575° F.----------------- G012 Clean Finish Above 575° F. -------------- G012 Clean Finish Below 575° F. --------------- G012 VESO Relay Circuits------------------------------ G013 VESO Relay Circuits (Update)------------------- G014 VEDO205 Built-in Electric Double Oven------- G015 Relay Circuits Upper Oven---------- G016 Relay Circuits Lower Oven & 8-Position Selector Switch----------------- G017 Relay Circuits Upper Oven (Update)----- G018 Relay Circuits Lower Oven (Update)---- G019 Upper Oven Bake-------------------------- G020 VEDO205 Lower Oven Bake--------------G021 Upper Oven Convection Bake------------- G022 Lower Oven Convection Bake------------- G023 Upper Oven Convection Cook-------------G024 Lower Oven Convection Cook------------ G025 UpperOvenMiniBroil-------------------- G026 Lower Oven Mini Broil-------------------- G027 Upper Oven Maxi Broil-------------------- G028 Lower Oven Maxi Broil-------------------- G029 Upper Oven Convection Broil------------- G030 Lower Oven Convection Broil------------- G031 Upper Oven Clean (Before Door Lock)-- G032 Upper Oven Clean (After Door Lock)---- G033 Lower Oven Clean (Before Door Lock)-- G034 Lower Oven Clean (After Door Lock)--- G035 Designer Series Electric Wall Ovens DESO105 Designer Oven (single)-------- G036 DESO105 Designer Time Piece (single)- G037 DEDO200 Designer Oven (double)------- G038 DEDE200 Designer Time Piece(double) G039 Designer Double Oven – Time Piece------------- G040 Designer Single Oven – Time Piece-------------- G041 Cooking Module Layout--------------------------- G042 DEDO271-201 Wiring Diagram------------------ G043 DEDO205-275 Wiring Diagram------------------ G044 DESO175-105 Wiring Diagram------------------- G045 DESO171-101 Wiring Diagram------------------- G046 VEDO277-207-265 Wiring Diagram------------- G047 VESO177-107-165 Wiring Diagram--------------G048 VEOS100 Built-in Smoker Oven Diagram-------G049 DESO-DEDO Install Pre-Heat Boards 1------- - G050 DESO-DEDO Install Pre-Heat Boards 2-------- G051 DESO-DEDO Install Pre-Heat Boards 3-------- G052 DESO-DEDO Install Pre-Heat Boards 4 ------ G053 DESO-DEDO Install Pre-Heat Boards 5 ------- G054 36” Single Wall Oven with Pre-Heat------------ G055 36” Bake/Initial Cycle with Pre--Heat---------- G056 36” Bake after First Cycle with Pre-Heat------- G057 36” Convection/Initial Cycle with Pre-Heat---- G058 36”ConvectionBake------------------------------ G059 36” Convection Cook------------------------------ G060 36” Mini-Broil-------------------------------------- G061 36” Maxi-Broil-------------------------------------- G062 36” Convection Broil------------------------------ G063 36” Clean Initiate until Door Lock-------------- G064 36” Clean Door Lock above 575o ± 25o-------- G065 36” Clean Door Lock below 575o ± 25o-------- G066 36” Clean Finish Door below 575o ± 25o------- G067 36” Double Wall Oven with Pre-Heat---------- G068 VEIS100 Built-in Smoker Oven----------------- G069 -
Manufacturer: GE Type of Appliance: Dish washer Model Number: Pdw9700n00ii Have you validated the model number at an online parts site like Repair Clinic? (yes or no): Yes Have you watched the video on how to search for manuals and have you searched the Downloads section prior to posting this request? (yes or no): Yes All I can find on this modes is info about poor wash performance and purging the bulk dispenser. Customer doesn't use bulk dispenser. Customer complaint is it fills but doesn't wash. She can get it to drain any info on this model would be greatly appreciated thanks
- 2 replies
-
- mini manual
- schematic
-
(and 2 more)
Tagged with:
-
Viking Built-In Electric Wall Ovens Schematics View File Table of Contents: VEDO 27” Electric Wall Oven------------------- G001 VEDO 27” Gas Wall Oven------------------------ G002 VEDO273 Component Testing---------G003 / G006 Schematic Wiring Diagram VEDO273 W. Wall Oven-------------------------- G007 / G008 VESO105 Wiring Diagram (Schematic) Built-in Electric 27” W. Single Wall Oven------ G009 Bake------------------------------------------- G010 Convection Bake---------------------------- G010 Convection Cook---------------------------- G010 Mini-Broil------------------------------------ G010 Maxi-Broil----------------------------------- G011 Convection Broil---------------------------- G011 Clean Initiate--------------------------------- G011 Door Lock Below 575° F.----------------- G011 Door Lock Above 575° F.----------------- G012 Clean Finish Above 575° F. -------------- G012 Clean Finish Below 575° F. --------------- G012 VESO Relay Circuits------------------------------ G013 VESO Relay Circuits (Update)------------------- G014 VEDO205 Built-in Electric Double Oven------- G015 Relay Circuits Upper Oven---------- G016 Relay Circuits Lower Oven & 8-Position Selector Switch----------------- G017 Relay Circuits Upper Oven (Update)----- G018 Relay Circuits Lower Oven (Update)---- G019 Upper Oven Bake-------------------------- G020 VEDO205 Lower Oven Bake--------------G021 Upper Oven Convection Bake------------- G022 Lower Oven Convection Bake------------- G023 Upper Oven Convection Cook-------------G024 Lower Oven Convection Cook------------ G025 UpperOvenMiniBroil-------------------- G026 Lower Oven Mini Broil-------------------- G027 Upper Oven Maxi Broil-------------------- G028 Lower Oven Maxi Broil-------------------- G029 Upper Oven Convection Broil------------- G030 Lower Oven Convection Broil------------- G031 Upper Oven Clean (Before Door Lock)-- G032 Upper Oven Clean (After Door Lock)---- G033 Lower Oven Clean (Before Door Lock)-- G034 Lower Oven Clean (After Door Lock)--- G035 Designer Series Electric Wall Ovens DESO105 Designer Oven (single)-------- G036 DESO105 Designer Time Piece (single)- G037 DEDO200 Designer Oven (double)------- G038 DEDE200 Designer Time Piece(double) G039 Designer Double Oven – Time Piece------------- G040 Designer Single Oven – Time Piece-------------- G041 Cooking Module Layout--------------------------- G042 DEDO271-201 Wiring Diagram------------------ G043 DEDO205-275 Wiring Diagram------------------ G044 DESO175-105 Wiring Diagram------------------- G045 DESO171-101 Wiring Diagram------------------- G046 VEDO277-207-265 Wiring Diagram------------- G047 VESO177-107-165 Wiring Diagram--------------G048 VEOS100 Built-in Smoker Oven Diagram-------G049 DESO-DEDO Install Pre-Heat Boards 1------- - G050 DESO-DEDO Install Pre-Heat Boards 2-------- G051 DESO-DEDO Install Pre-Heat Boards 3-------- G052 DESO-DEDO Install Pre-Heat Boards 4 ------ G053 DESO-DEDO Install Pre-Heat Boards 5 ------- G054 36” Single Wall Oven with Pre-Heat------------ G055 36” Bake/Initial Cycle with Pre--Heat---------- G056 36” Bake after First Cycle with Pre-Heat------- G057 36” Convection/Initial Cycle with Pre-Heat---- G058 36”ConvectionBake------------------------------ G059 36” Convection Cook------------------------------ G060 36” Mini-Broil-------------------------------------- G061 36” Maxi-Broil-------------------------------------- G062 36” Convection Broil------------------------------ G063 36” Clean Initiate until Door Lock-------------- G064 36” Clean Door Lock above 575o ± 25o-------- G065 36” Clean Door Lock below 575o ± 25o-------- G066 36” Clean Finish Door below 575o ± 25o------- G067 36” Double Wall Oven with Pre-Heat---------- G068 VEIS100 Built-in Smoker Oven----------------- G069 Submitter jvanhorn Submitted 03/30/2017 Category Appliance Repair Manual Pot Luck Supper
-

Applying Circuit Fu Katas on a Whirlpool Electric Dryer Schematic
Samurai Appliance Repair Man posted a blog entry in Samurai Appliance Repair Man's Blog
In this video, I use an old skool Whirlpool electric dryer to demonstrate electric circuit troubleshooting and analysis techniques. This is the ancient art of Circuit Fu. Although this is a simple circuit by today's standards, the principles and techniques can be used on any circuit because electricity works the same way. When you know basic electricity and circuits, you can decipher these diagrams and become a troubleshooting master... Learn Circuit Fu and how to kick appliance butt at the Master Samurai Tech Academy. The training is distilled down to the fundamental essentials that every appliance tech should know (but, alas, many do not). The training covers the classic skills, like those shown above, yet is up to to date with the current technologies used in modern appliances. Our training is affordable for anyone, self paced, on demand, and comprehensive. Enroll at the Master Samurai Tech Academy and start learning today: http://MasterSamuraiTech.com-
- circuit fu
- troubleshooting
-
(and 2 more)
Tagged with:
-

Triac schematic symbol
Samurai Appliance Repair Man posted a gallery image in The Appliantology Gallery
From the album: Triacs
-

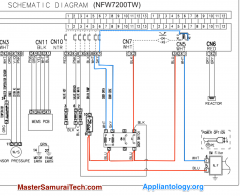
Amana Samsung NFW7200TW Washer Door Lock Schematic Trace
Samurai Appliance Repair Man posted a gallery image in The Appliantology Gallery
From the album: Washer Repair
Topic: -

Troubleshooting a Bosch Dishwasher No Heat Problem Using the Schematic and Live Tests
Samurai Appliance Repair Man posted a blog entry in Samurai Appliance Repair Man's Blog
In this video for Professional Appliantologist members and Master Samurai Tech Academy students, I show you how to troubleshoot a Bosch dishwasher no-heat problem. No heat problems can manifest in a variety of ways: really long cycle times, a "1" shown on the display at the end of the cycle, or as an error code. Some models will show an error code readout, others may just show the error code as a flashing light. Whichever way, you need to troubleshoot the heating circuit. As with all electrical problems, you need to use the schematic to pinpoint the open (bad) component. The problem could be the circuit board heating relay, the heater thermostat, the heating element itself, or the pressure switch. I show you how to use the schematic and live voltage tests to pinpoint the exact problem. Professional Appliantologist members can watch the video at the link below: Master Samurai Tech Academy students can watch the video here: http://mastersamuraitech.com/webinar-recording-troubleshooting-bosch-dishwasher-no-heat-problem-using-schematic-live-tests/ Here's the schematic used in the video: Learn how to troubleshoot like a pro online at the Master Samurai Tech Academy: http://mastersamuraitech.com-
- schematic
- live tests
-
(and 3 more)
Tagged with:
-

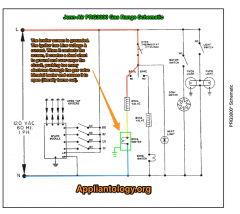
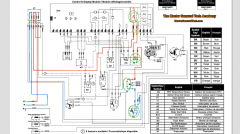
Jenn-Air PRG3000 Gas Range Schematic
Samurai Appliance Repair Man posted a gallery image in The Appliantology Gallery
From the album: Ovens, Ranges, Stoves
-

Bosch SHE44C05UC-36 Dishwasher Schematic 58300000116595
Samurai Appliance Repair Man posted a gallery image in The Appliantology Gallery
From the album: Dishwasher Repair
Used in this troubleshooting video for Professional Appliantologist members:-
- bosch
- dishwasher
-
(and 1 more)
Tagged with:
-

Troubleshooting a Samsung Electric Dryer No-Heat Problem from the Control Board
Samurai Appliance Repair Man posted a blog entry in Samurai Appliance Repair Man's Blog
Join the Samurai on this Samsung electric dryer service call and learn how to troubleshoot a no-heat complaint from the control board, without having to tear apart the whole dryer, by using the schematic and strategic electrical tests. Work smarter, not harder! Learn how to troubleshoot appliances like a real technician at http://mastersamuraitech.com Professional Appliantologist members here at Appliantology should watch my webinar recording on troubleshooting this same problem using live voltage tests for deeper understanding of troubleshooting techniques -

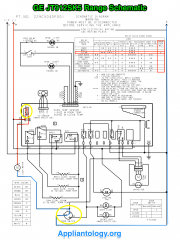
GE JT912SK5 Range Schematic
Samurai Appliance Repair Man posted a gallery image in The Appliantology Gallery
From the album: Ovens, Ranges, Stoves
-

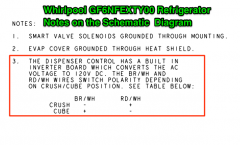
Whirlpool GF6NFEXTY00 Refrigerator Schematic Notes
Samurai Appliance Repair Man posted a gallery image in The Appliantology Gallery
From the album: Refrigerator Repair
-
- whirlpool
- refrigerator
-
(and 2 more)
Tagged with:
-

Understanding and Troubleshooting with Bosch Schematic Diagrams
Samurai Appliance Repair Man posted a blog entry in Samurai Appliance Repair Man's Blog
Bosch schematics are notoriously cryptic and look different from the schematics used by other appliance manufacturers. But electricity still works the same way in Germany as it does in Korea, the US, or anywhere else in the known universe. Don't let the unfriendly nature of their schematics fool you into thinking otherwise! Once you understand a few simple conventions used by Bosch, you'll be troubleshooting with Bosch schematics as easily as you use Whirlpool's or any other manufacturer. In this excerpt from a recent Office Hours webinar, we decoded the schematic for a Bosch dishwasher and used it to troubleshoot various hypothetical problem scenarios. During this webinar, we reviewed five different tech sheets and schematics; this Bosch dishwasher schematic was one of those. Hopefully, this will give you some insight into reading Bosch schematics and using them to troubleshoot.-
- bosch
- dishwasher
-
(and 2 more)
Tagged with:
-

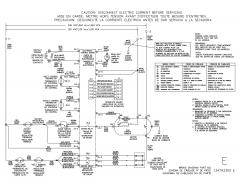
Electrolux EIGD50LIW0 Electric Dryer Schematic
Samurai Appliance Repair Man posted a gallery image in The Appliantology Gallery
From the album: Dryer Repair
-
- electrolux
- dryer
-
(and 1 more)
Tagged with:
-

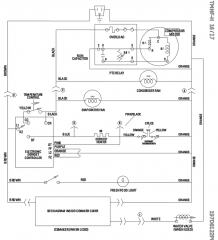
GE GTH18EBTZRWW Refrigerator Schematic
Samurai Appliance Repair Man posted a gallery image in The Appliantology Gallery
From the album: Refrigerator Repair
-
- ge
- refrigerator
-
(and 1 more)
Tagged with:
-

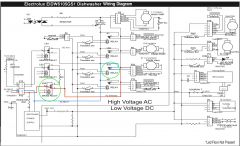
Electrolux EIDW6105GS1 Dishwasher Wiring Diagram
Samurai Appliance Repair Man posted a gallery image in The Appliantology Gallery
From the album: Dishwasher Repair
-
- Electrolux
- dishwasher
-
(and 1 more)
Tagged with:
-

Amana BBI20TPSW Refrigerator Schematic Annotated
Samurai Appliance Repair Man posted a gallery image in The Appliantology Gallery
From the album: Refrigerator Repair
-
- Amana
- refrigerator
-
(and 1 more)
Tagged with:
-
Looking for schematic for above

